Programmable hardware TOTP token in a card format that fits any authentication system
Classic hardware TOTP token with SHA-1 algorithm support
Programmable hardware TOTP token in a key fob format that fits any authentication system
Classic hardware TOTP token with SHA-256 algorithm support
Programmable hardware TOTP token in a card format that fits any authentication system
Classic hardware TOTP token with SHA-1 algorithm support
Programmable hardware TOTP token in a key fob format that fits any authentication system
Classic hardware TOTP token with SHA-256 algorithm support
A free 2FA authenticator app with cloud backup, easy token transfer to a new phone, PIN and biometric authentication protection
Free OTP delivery with chatbots in messaging apps
Delivery of one-time passwords via SMS messages
Free delivery of one-time passwords via email
Free one-time passwords delivery via push notifications
Guides
Protectimus two-factor authentication (2FA) system supports an SP (Service Provider) initiated Single Sign On (SSO).
This means that your end-users will have the ability to sign into their accounts directly from the protected resource login page. When the end-user tries to sign into a protected resource, an authorization request is sent to the Identity Provider (Protectimus). Once the Protectimus authenticates the user’s identity, the user is logged into their account in the protected resource.
A scheme of interaction of Protectimus On-Premise Two-Factor Authentication Platform with Microsoft Office 365 through Keycloak is presented below.
Admin -> Show all -> Azure Active Directory -> Custom domain names -> “Add custom domain”
In DNS, you need to create a TXT record to confirm adding a domain to Azure AD.
https://www.microsoft.com/en-us/download/details.aspx?id=47594
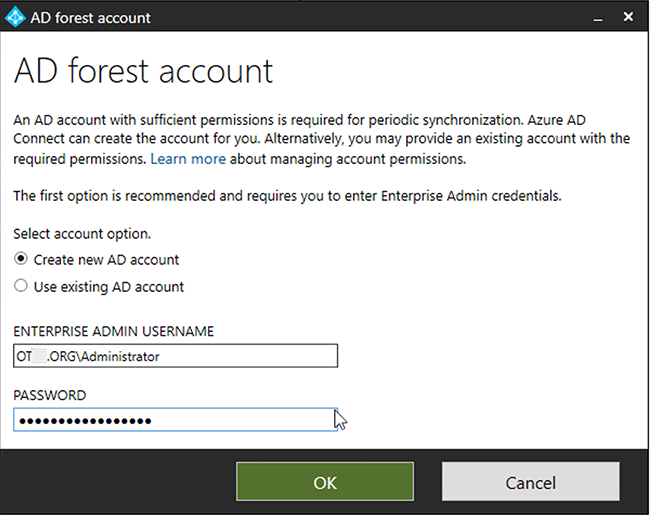
Continue -> Customize -> Install (No checked options) -> Password Hash Synchronization -> Next -> Connect to Azure AD:
username@[something].onmicrosoft.com pass:
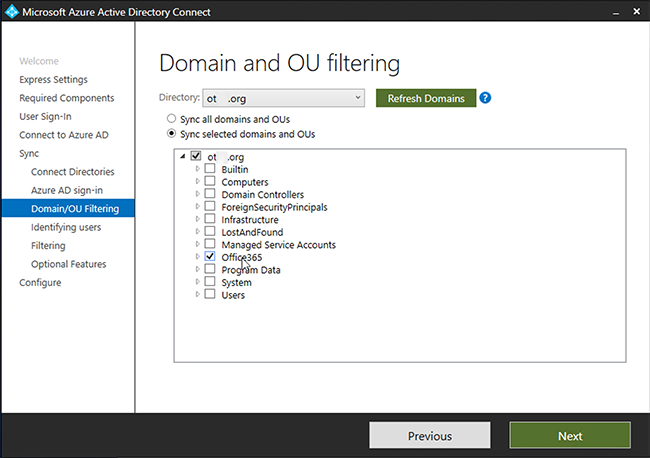
Next -> Add Directory -> domain
You can create a separate Organizational Unit (OU) for users whose accounts must be protected with two-factor authentication and set up synchronization only for this OU. Every User in this OU must have an email, it will be used as a UPN (User Principal Name).
(Check the image below) ↓

Next -> Next -> Sync Selected Domain

Next -> Next -> Next -> Exit.
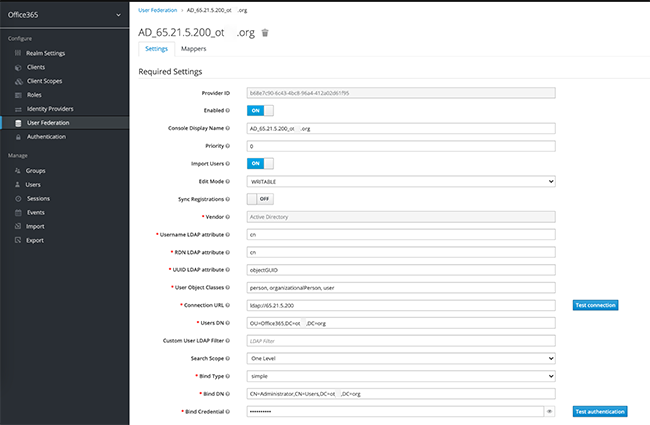
Add Realm, for example, name it Office365.
Add Mapper:

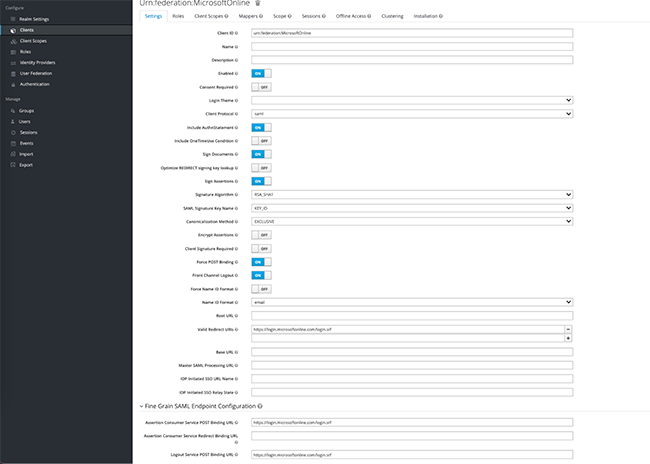
ATTENTION! It is important to name the file: “urn:federation:MicrosoftOnline”

First of all, you need to get a SAML certificate and check it using this URL:
https://kc.dev.protectimus.com/auth/realms/[realm name]/protocol/saml/descriptor
Or check the certificate using the corresponding feature in the interface – SAML keys.
If you’ll be asked about NuGet and PSGallery – install them too.
Execute the following script:
# get the public key certificate from keycloak
# https://kc.dev.protectimus.com/auth/realms/2608/protocol/saml/descriptor
# see X509Certificate
$cert="MIICoTCCAYkCBgF3Y+nVLjANBgkqhkiG9w0BAQsFADAUMRIwEAYDVQQDDAlvZmZpY2UzNjUwHhcNMjEwMjAyMTgwMTQ0WhcNMzEwMjAyMTgwMzI0WjAUMRIwEAYDVQQDDAlvZmZpY2UzNjUwggEiMA0GCSqGSIb3DQEBAQUAA4IBDwAwggEKAoIBAQC3eE+GuP2ubqH0C2sceb1iBsPr5LNIK0dtW67CQPL2tLM0YlRAFXu2sWRMKwPl8ZULvMzufA855j0Chd5KX1izVi8c6fclqge+OB9iMB05Ew/zGb8zmCXETgVU9+lsQFchd8M/I/i0QKKOatIbP50t9SKJI5daX78wb/IVk2pexB76cqXaQrrddh9ksXo3OFyFpAk1xlCC9Nu77QLCPWK4fBnSEbnzxDP3ZMhPXMQsn3MbD1SHGmHmJ93wMeXFGGIU77aDI/uAYZj1tb7dj/aICqG8RpUVXEolf8BDH/nT2TonYSmMaSqd99wCNJaKJWpyPd2qid7118DtOyPzZza/AgMBAAEwDQYJKoZIhvcNAQELBQADggEBAFglY4CdTJkGTL7/YUY1uBhSTSGvtbv6GiQ+2Uox3JVNVECB1Za63mUU1tTC/r4Jp02jRnTtBfSR7Sra+HDIKgAOkwcVTh2P++i1bk7PiY1Rb2ePrBtXWnb0GC8qCLAOK7b2/y9E1K5Wjg2Qg1dxnNZFys8CLpHkkYwMwChJA6E8DMg/bWUYfighBo4mAUpORAwqkmEB2mC39VbWZAUyBysQ5Cb9xK8RWnOgj7XhZfhpihK815z+uwirQjOFmGhWs2Mxk9PHkPkCFeWdcGGoRPvBuVYaG5/MrWu5hqQFtiu4ZDsySEnBdUqfudD6Iorc6QHVYf6VCunSIdE9L9sIovs="

$uri="https://kc.dev.protectimus.com/auth/realms/Office365/protocol/saml"
$issuer_uri="https://kc.dev.protectimus.com/auth/realms/Office365"
$dom="yourdomain.com"

$cred = Get-Credential
Connect-MsolService -Credential $cred

Set-MsolDomainAuthentication -DomainName $dom  -Authentication Federated -ActiveLogOnUri $uri -SigningCertificate $cert -PassiveLogOnUri $uri -IssuerUri $issuer_uri -LogOffUri $uri -PreferredAuthenticationProtocol SAMLP
You can check if the operation has been performed successfully:
Get-MsolDomainFederationSettings -DomainName domain.nameExecute the following script:
$dom="yourdomain.com"
Set-MsolDomainAuthentication -DomainName $dom -Authentication managed
Everything is ready, open office365.com and try to log in with an account from AD.
If you have other questions, contact our customer support service.
Protectimus Ltd
Carrick house, 49 Fitzwilliam Square,
Dublin D02 N578, Ireland
Ireland: +353 19 014 565
USA: +1 786 796 66 64
Protectimus Ltd
Carrick house, 49 Fitzwilliam Square,
Dublin D02 N578, Ireland
Ireland: +353 19 014 565
USA: +1 786 796 66 64


