Програмований апаратний TOTP-токен у форматі карти
Класичні апаратні TOTP-токени SHA-1 з попередньо встановленими секретними ключами
Програмований апаратний TOTP-токен у форматі брелока
Класичний апаратний TOTP-токен з підтримкою алгоритму SHA-256
Програмований апаратний TOTP-токен у форматі карти
Класичні апаратні TOTP-токени SHA-1 з попередньо встановленими секретними ключами
Програмований апаратний TOTP-токен у форматі брелока
Класичний апаратний TOTP-токен з підтримкою алгоритму SHA-256
Безкоштовний застосунок для двофакторної автентифікації з хмарним бекапом, простим перенесенням токенів на новий телефон, PIN-кодом і біометричною автентифікацією
Безкоштовна доставка OTP через чат-ботів у месенджерах
Доставка одноразових паролів за допомогою SMS-повідомлень
Безкоштовна доставка одноразових паролів електронною поштою
Доставка одноразових паролів через push-повідомлення
Інструкції
Ця інструкція описує, як налаштувати багатофакторну автентифікацію (MFA або 2FA) для NetApp Virtual Desktop Service (VDS) за допомогою протоколу RADIUS.
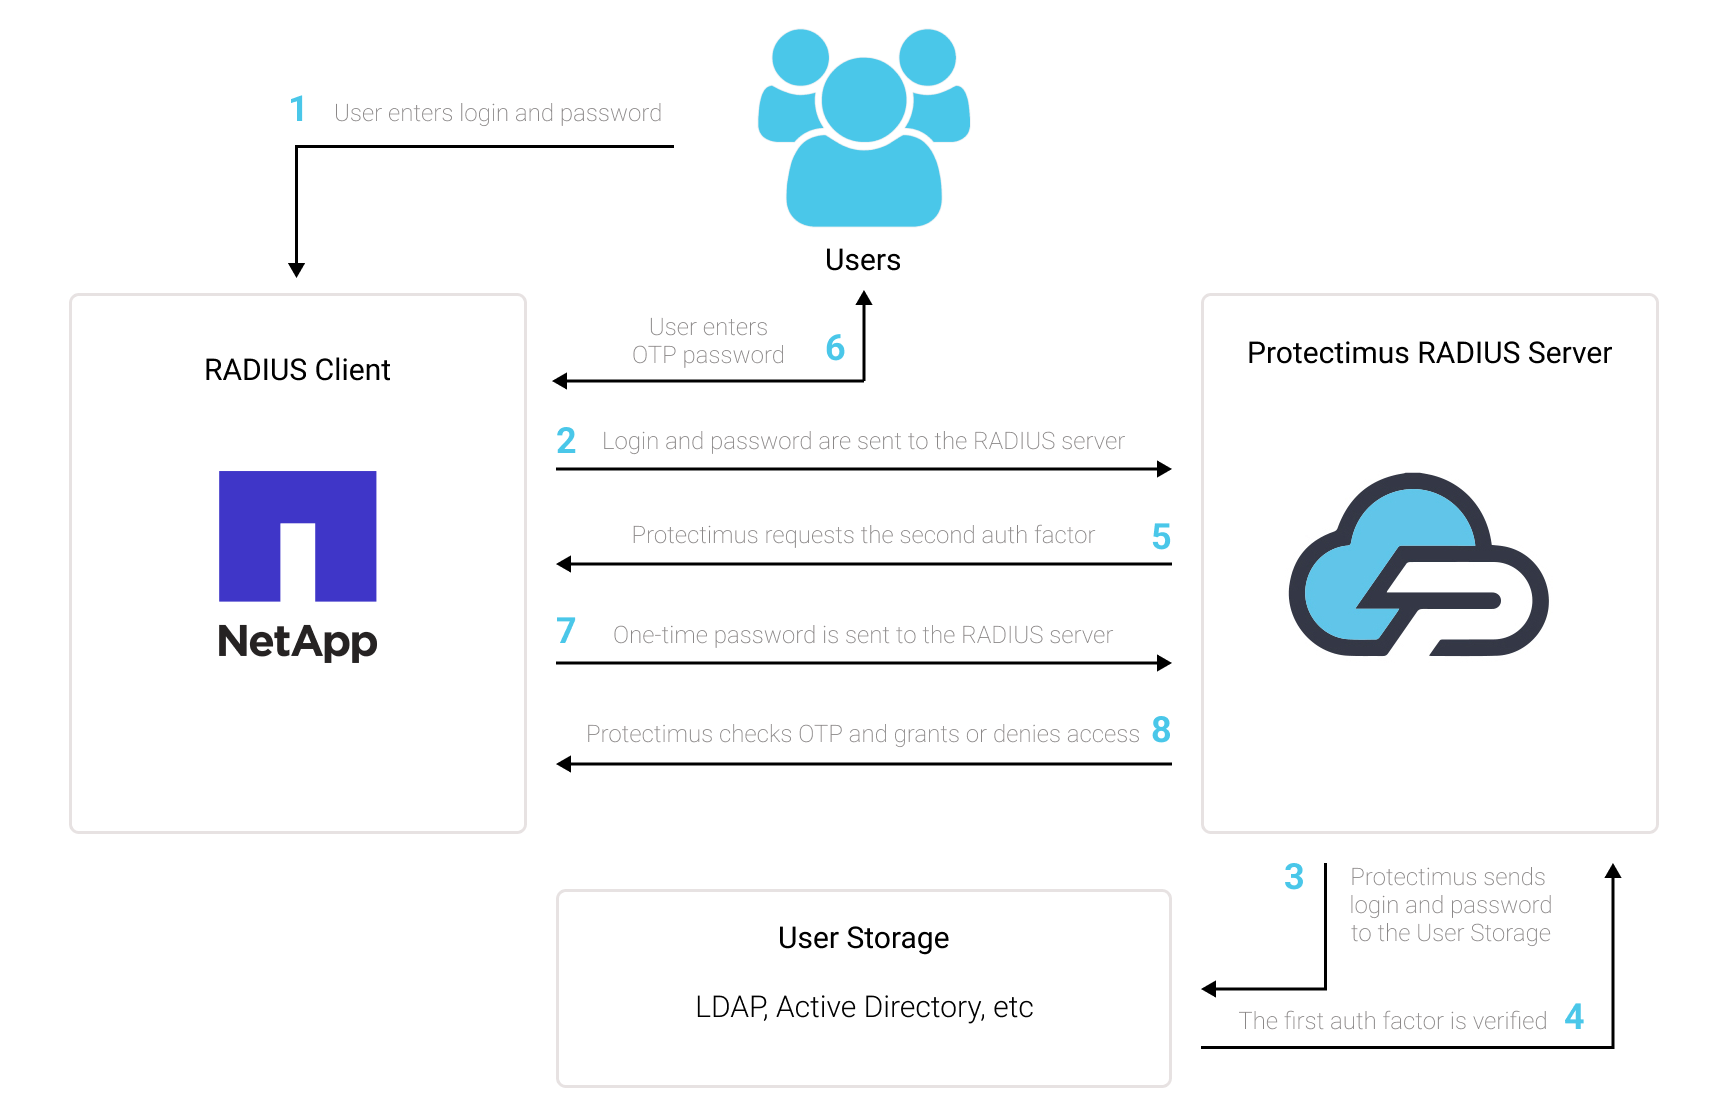
Під час інтеграції двофакторної автентифікації Protectimus з NetApp Virtual Desktop Service через RADIUS, хмарний сервіс або локальна платформа багатофакторної автентифікації Protectimus виступає як RADIUS сервер за допомогою спеціального конектора — Protectimus RADIUS Server. NetApp VDS, у свою чергу, працює як RADIUS клієнт.
Ось як це працює: конектор Protectimus RADIUS Server передає запити на автентифікацію від NetApp VDS до сервера багатоетапної автентифікації Protectimus. Залежно від отриманої відповіді доступ надається або забороняється.
Нижче ми наводимо приклад інтеграції Protectimus 2FA з NetApp Virtual Desktop Service для безперебійної роботи багатоетапної автентифікації (MFA) на NetApp VDS.

Ви можете налаштувати багатофакторну аутентифікацію (2FA) для NetApp VDS за допомогою Protectimus, використовуючи протокол RADIUS:
- Зареєструйтесь у SAAS сервісі Protectimus або встановіть локальну платформу Protectimus та налаштуйте основні параметри.
- Встановіть та налаштуйте Protectimus RADIUS Server.
- Додайте Protectimus як RADIUS сервер для NetApp Virtual Desktop Service.
Детальні інструкції щодо встановлення та налаштування Protectimus RADIUS Server для двофакторної автентифікації (2FA) в NetApp Virtual Desktop Service за допомогою RADIUS доступні в нашому Посібнику по встановленню Protectimus RADIUS Server для NetApp Virtual Desktop Service 2FA.
| Label | Придумайте назву для вашого RADIUS сервера. |
| Hostname/Address | IP адреса сервера, на якому встановлено компонент Protectimus RADIUS Server. |
| Authentication Port | Вкажіть порт 1812 (або той, який ви налаштували у файлі radius.yml під час налаштування Protectimus RADIUS Server). |
| Authentication type | Потрібна аутентифікація за допомогою PAP. |
| Shared secret code | Вкажіть секретний ключ, який ви створили у файлі radius.yml (властивість radius.secret) при налаштуванні Protectimus RADIUS Server. |
| Server timeout (in seconds) | Встановіть значення 90 секунд. |
| Max attempts | Тут потрібно вказати, скільки разів має бути надіслано запит на автентифікацію. Встановіть значення 1. |
Інтеграція двофакторної автентифікації (2FA/MFA) для вашої NetApp Virtual Desktop Service завершена.
Якщо у вас є запитання, зверніться до служби підтримки клієнтів Protectimus.
Protectimus Ltd
Carrick house, 49 Fitzwilliam Square,
Dublin D02 N578, Ireland
Ірландія: +353 19 014 565
США: +1 786 796 66 64
Protectimus Ltd
Carrick house, 49 Fitzwilliam Square,
Dublin D02 N578, Ireland
Ірландія: +353 19 014 565
США: +1 786 796 66 64


