Програмований апаратний TOTP-токен у форматі карти
Класичні апаратні TOTP-токени SHA-1 з попередньо встановленими секретними ключами
Програмований апаратний TOTP-токен у форматі брелока
Класичний апаратний TOTP-токен з підтримкою алгоритму SHA-256
Безкоштовний застосунок для двофакторної автентифікації з хмарним резервним копіюванням, простим перенесенням токенів на новий телефон, PIN-кодом і біометричною автентифікацією
Безкоштовна доставка OTP через чат-ботів у месенджерах
Доставка одноразових паролів за допомогою SMS-повідомлень
Безкоштовна доставка одноразових паролів електронною поштою
Доставка одноразових паролів через push-повідомлення
Інструкції
У цій інструкції ви знайдете пояснення, як налаштувати багатофакторну автентифікацію (MFA / 2FA) для F5 BIG-IP APM VPN за допомогою системи двофакторної автентифікації Protectimus.
Система двофакторної автентифікації Protectimus інтегрується з F5 BIG-IP APM VPN через протокол автентифікації RADIUS. У цьому випадку хмарний сервіс або локальна платформа 2FA Protectimus виконують роль сервера RADIUS, а F5 BIG-IP VPN – роль клієнта RADIUS.
Схема роботи рішення Protectimus для двофакторної автентифікації (2FA) в F5 BIG-IP APM VPN наведена нижче.
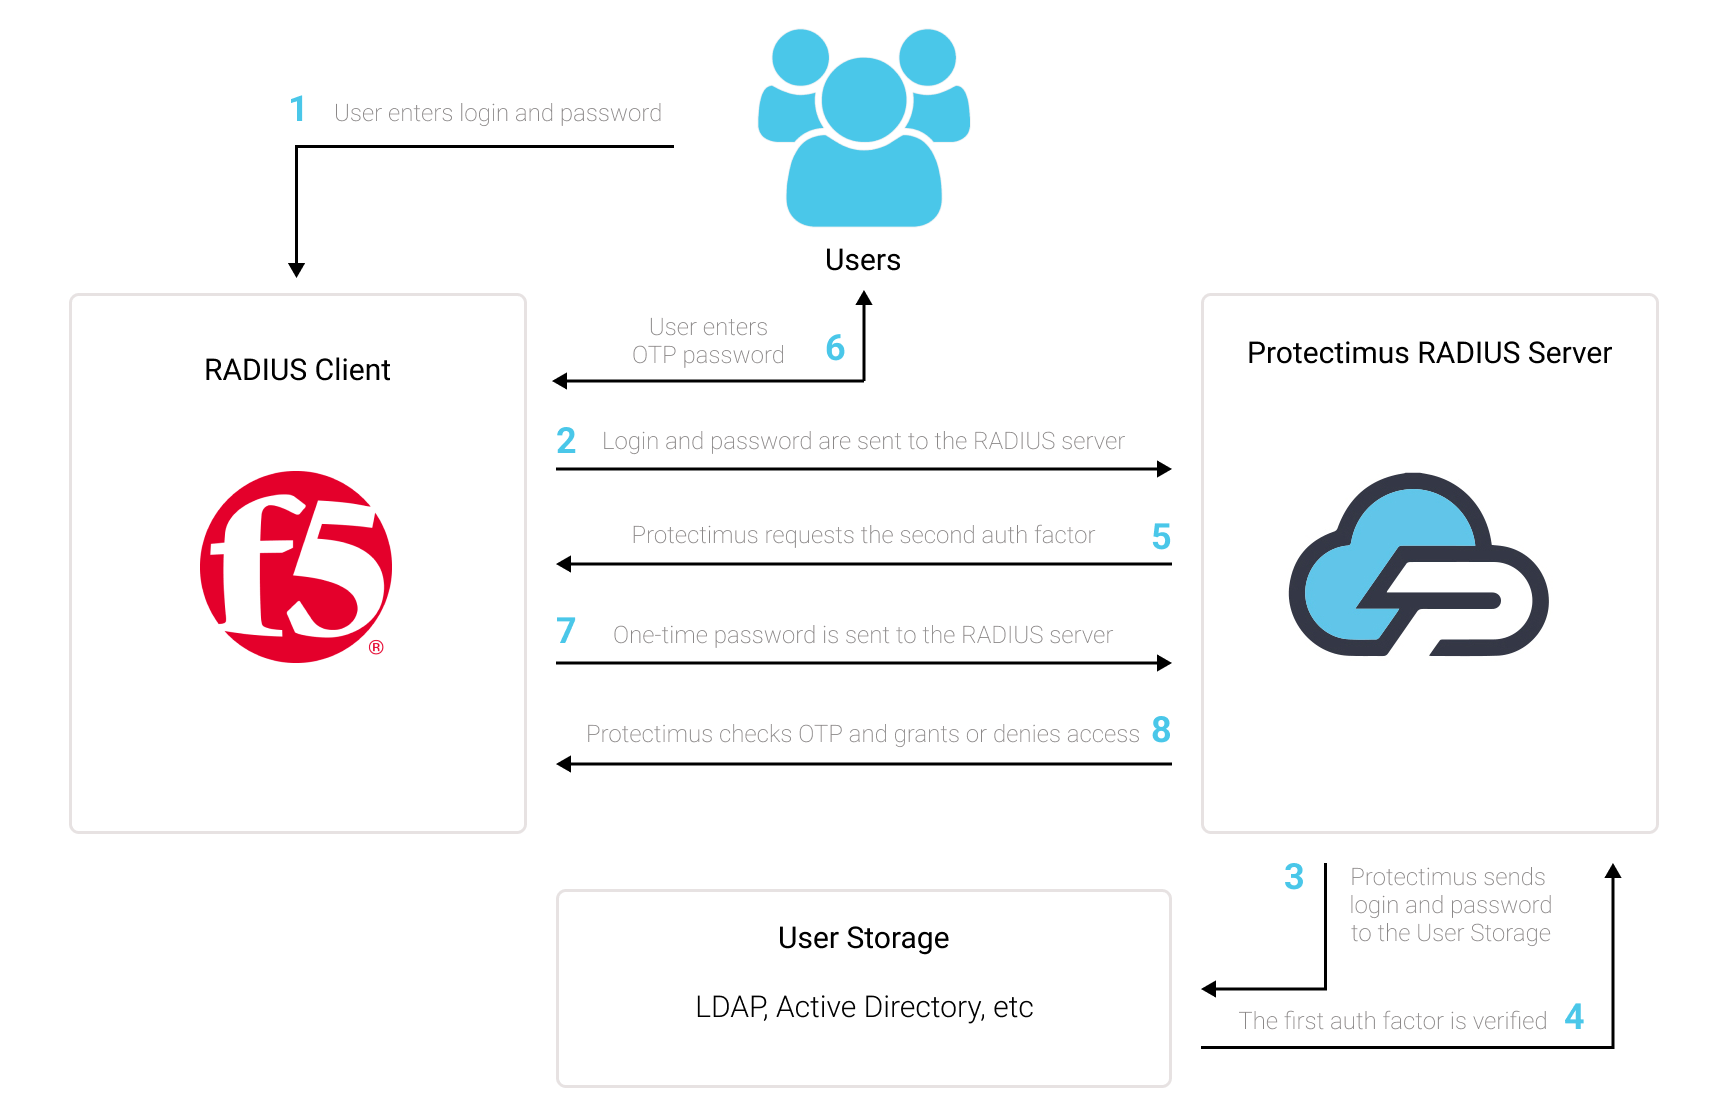
Рішення двофакторної автентифікації Protectimus для F5 BIG-IP APM VPN додає додатковий рівень безпеки для входу у ваш F5 BIG-IP VPN.
Коли ви налаштуєте двофакторну автентифікацію (2FA/MFA) у F5 VPN, ваші користувачі використовуватимуть два різні фактори автентифікації для доступу до своїх облікових записів.
Щоб зламати VPN F5 BIG-IP APM, захищений двофакторною автентифікацією, хакеру потрібно одночасно отримати стандартний пароль і одноразовий пароль. При цьому на злам одноразового пароля у нього є лише 30 секунд. Це майже неможливо, що робить двофакторну автентифікацію такою ефективною проти брутфорсу, підміни даних, кейлогерів, фішингу, атак «людина посередині», соціальної інженерії та подібних хакерських атак.
Ви можете налаштувати багатофакторну автентифікацію (2FA) для F5 BIG-IP VPN за допомогою Protectimus через протокол RADIUS:
- Зареєструйтесь у SAAS сервісі Protectimus або встановіть локальну платформу Protectimus та налаштуйте основні параметри.
- Встановіть та налаштуйте Protectimus RADIUS Server.
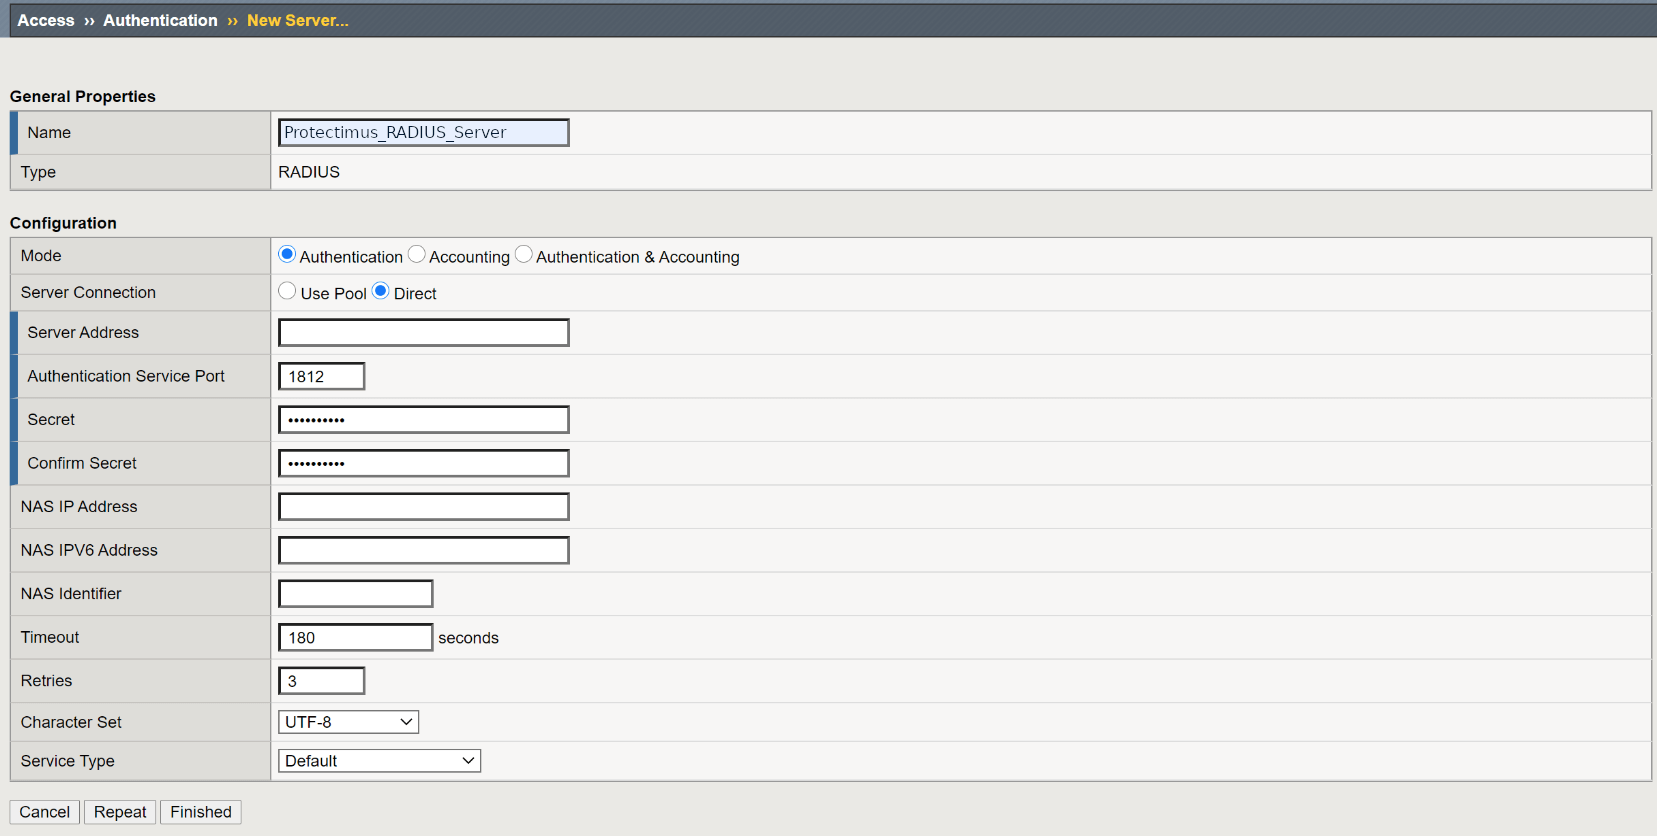
- Додайте Protectimus як RADIUS-сервер для F5 BIG-IP APM VPN.
Докладні інструкції щодо встановлення та налаштування Protectimus RADIUS Server доступні в нашому Посібнику з налаштування Protectimus RADIUS Server для F5 BIG-IP APM VPN 2FA.
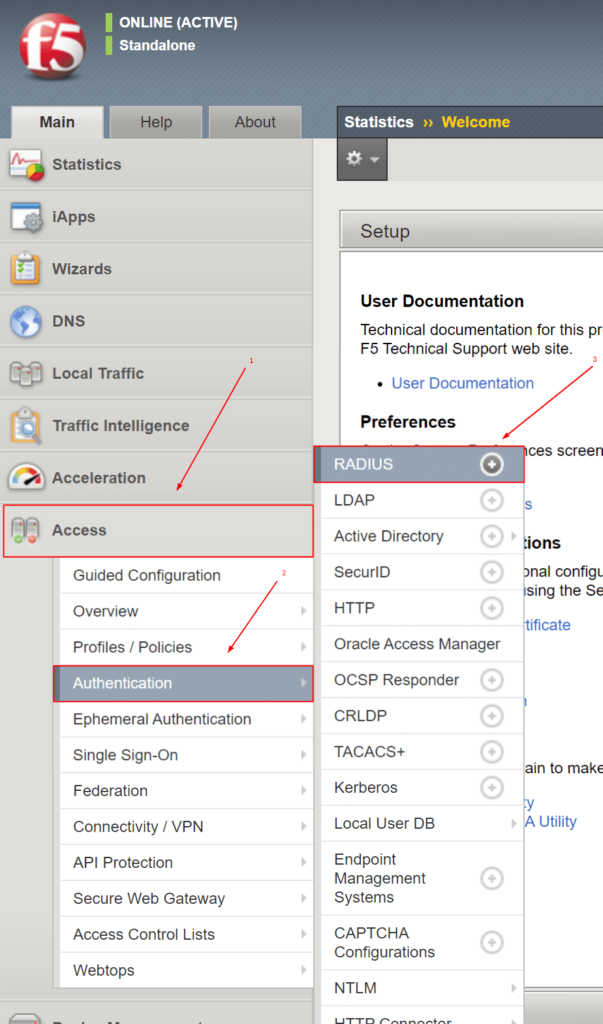
| Name | Введіть будь-яку назву для вашого RADIUS-сервера — наприклад, Protectimus_RADIUS_Server або будь-яку іншу, яку ви бажаєте. |
| Mode | Authentication |
| Server Connection | Direct |
| Server Address | Введіть IP-адресу сервера, на якому встановлений компонент Protectimus RADIUS Server. |
| Authentication Service Port | Вкажіть порт 1812 (або інший порт, який ви налаштували в файлі radius.yml під час конфігурації Protectimus RADIUS Server). |
| Secret | Вкажіть секретний ключ, який ви створили в файлі radius.yml (властивість radius.secret) під час конфігурації Protectimus RADIUS Server. |
| Confirm Secret | Підтвердіть секретний ключ. |
| Timeout | Встановіть значення 180 секунд. |
| Retries | Встановіть значення 3. |
| Character Set | Встановіть значення UTF-8. |
| Service Type | Встановіть значення Default. |
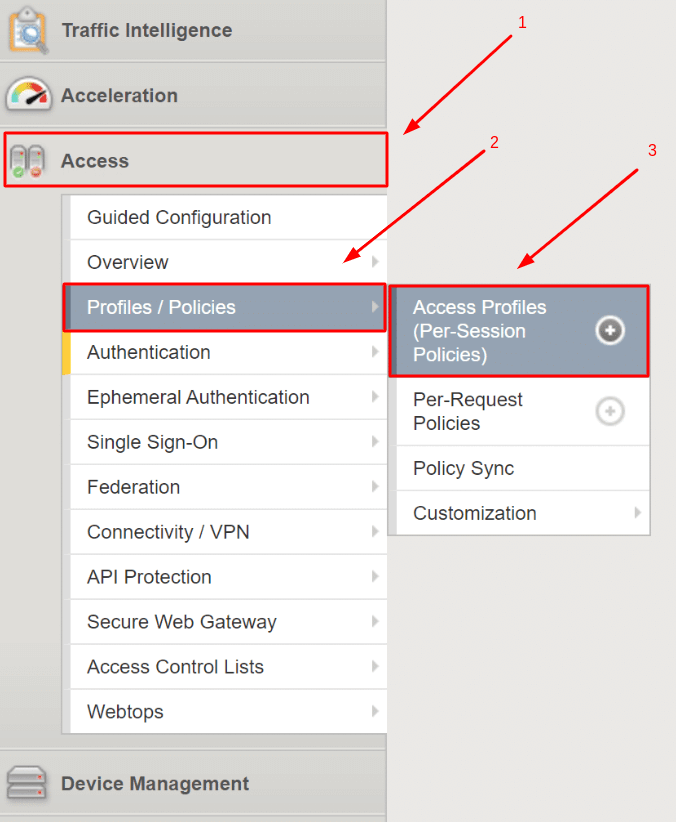


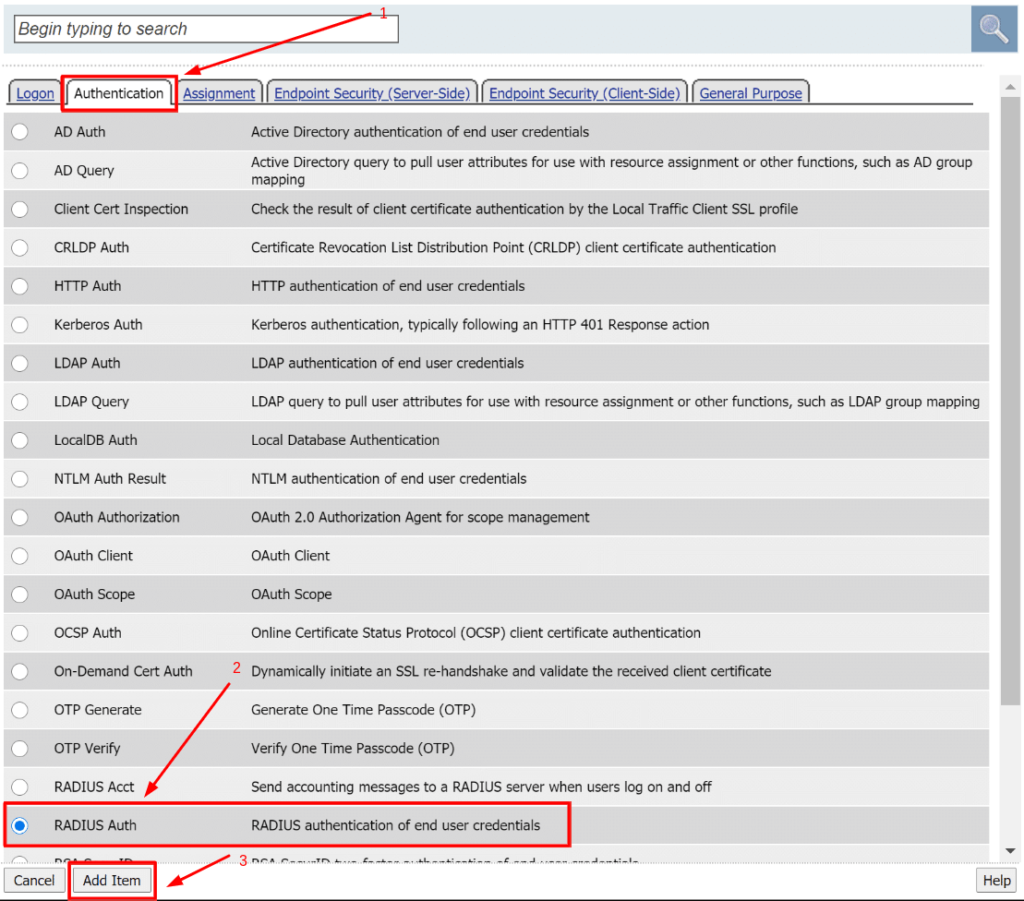
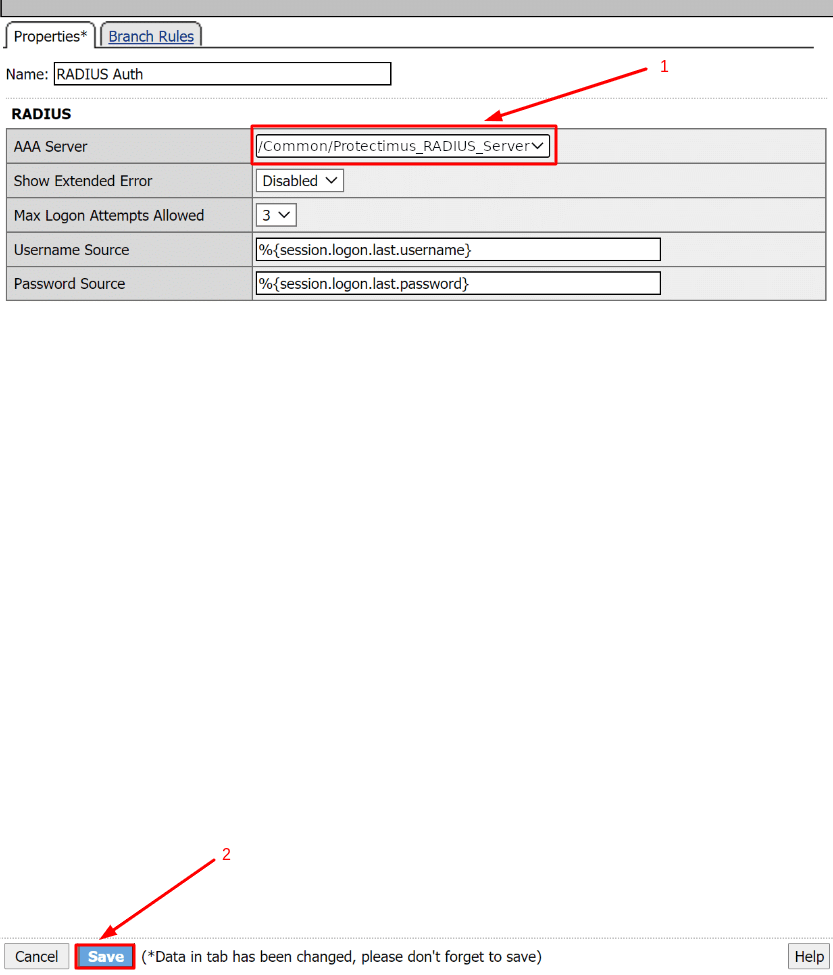
УВАГА! Якщо у вас є попередній метод автентифікації (наприклад, Active Directory), ви можете або видалити його, або залишити.
Ви можете зберегти попередній метод автентифікації та використовувати Protectimus після або перед цим методом автентифікації.
Щоб видалити його, натисніть X, виберіть Connect previous node to Successful branch, та натисніть Delete.
Інтеграція двофакторної автентифікації (2FA/MFA) для вашого F5 BIG-IP APM VPN завершена.
Якщо у вас є запитання, зверніться до служби підтримки клієнтів Protectimus.
Protectimus Ltd
Carrick house, 49 Fitzwilliam Square,
Dublin D02 N578, Ireland
Ірландія: +353 19 014 565
США: +1 786 796 66 64
Protectimus Ltd
Carrick house, 49 Fitzwilliam Square,
Dublin D02 N578, Ireland
Ірландія: +353 19 014 565
США: +1 786 796 66 64


