Локальна платформа двофакторної автентифікації Protectimus може бути встановлена на ваших власних серверах або в приватній хмарі.
- Вимоги до встановлення на власному сервері: Java (JDK версії 8); СУБД PostgreSQL версії 10 або новішої.
- Вимоги до встановлення на приватній хмарі: 2 Core (CPU), 8 GB (MEM); ОС: Linux/Windows; Disk: 20GB; Load Balancer.
Щоб забезпечити безперебійну роботу сервера багатофакторної автентифікації, розгорніть кластер із декількох серверів (рекомендуємо використовувати не менше трьох нод). Для розподілу навантаження між ними використовуйте балансувальник навантаження.
Щоб встановити локальну платформу Protectimus, ви можете скористатися інсталятором для Windows або створити Docker-образ.
Як розпочати роботу з MFA-платформою Protectimus
- Встановіть платформу Protectimus, створивши образ Docker, або скористайтеся інсталятором для Windows.
- Зареєструйтеся та активуйте ліцензію.
- Налаштуйте синхронізацію користувачів з вашим каталогом користувачів (або вручну додайте/імпортуйте користувачів).
- Налаштуйте основні параметри, зокрема додайте ресурси та токени.
- Випустіть та імпортуйте довірений SSL-сертифікат.
- Інтегруйте платформу у свою інфраструктуру.
Для отримання додаткової інформації перегляньте ці важливі ресурси:
1. Встановлення платформи Protectimus за допомогою образу Docker
- Щоб розпочати встановлення локальної платформи Protectimus, перш за все, завантажте та встановіть docker і docker-compose:
- Потім клонуйте git-репозиторій: https://github.com/protectimus/platform-linux.git
- Перейдіть до каталогу platform-linux/platform і запустіть:
docker-compose up -d
- Процес розгортання платформи можна відстежувати за допомогою команди:
docker-compose logs -f
- Після завершення процесу розгортання платформа буде доступна за адресою: https://localhost:8443.
2. Встановлення платформи Protectimus на Windows
- Завантажте та запустіть інсталятор Protectimus Platform за допомогою кнопки нижче.
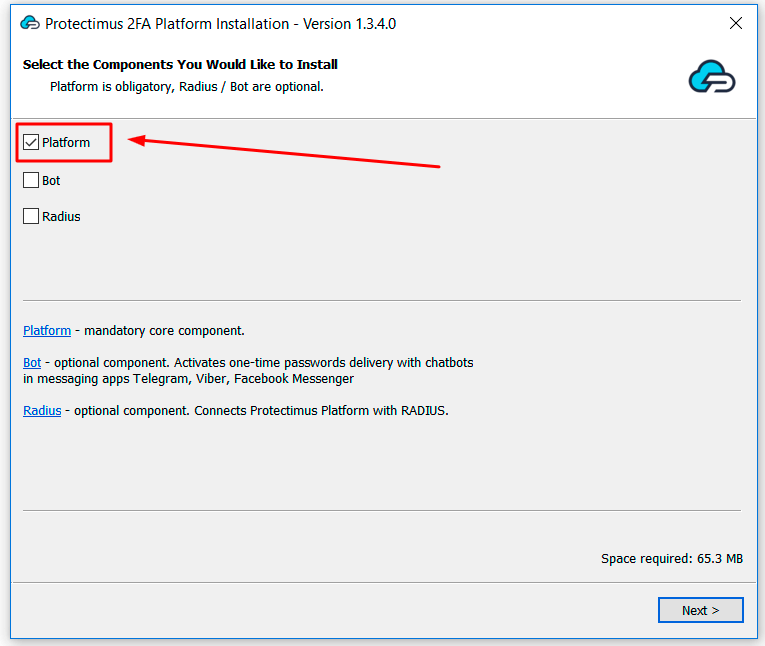
Оберіть пункт Platform і натисніть Next.
Якщо ви плануєте використовувати RADIUS-інтеграцію та доставку OTP через чат-ботів у Telegram, Facebook Messenger чи Viber, встановіть відповідні галочки.
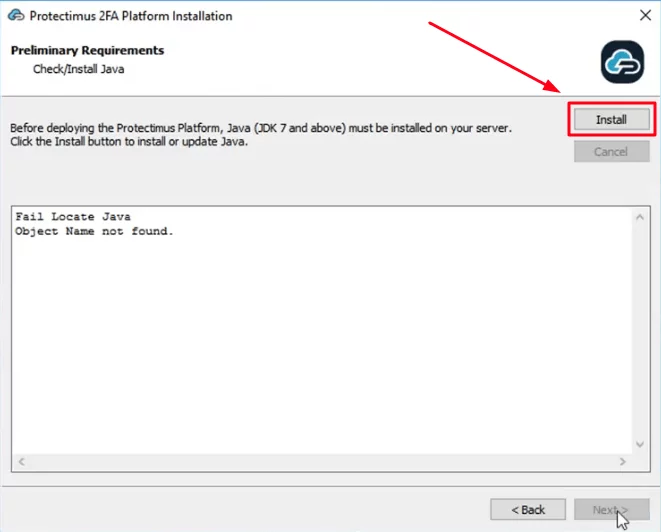
- Перед розгортанням платформи Protectimus на вашому сервері має бути встановлена Java. Натисніть кнопку Install, щоб перевірити наявність Java. Якщо вона ще не встановлена, остання версія JDK буде встановлена автоматично.
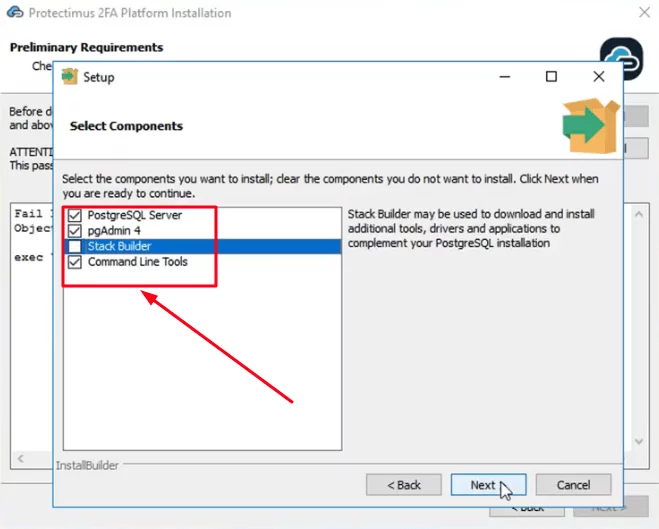
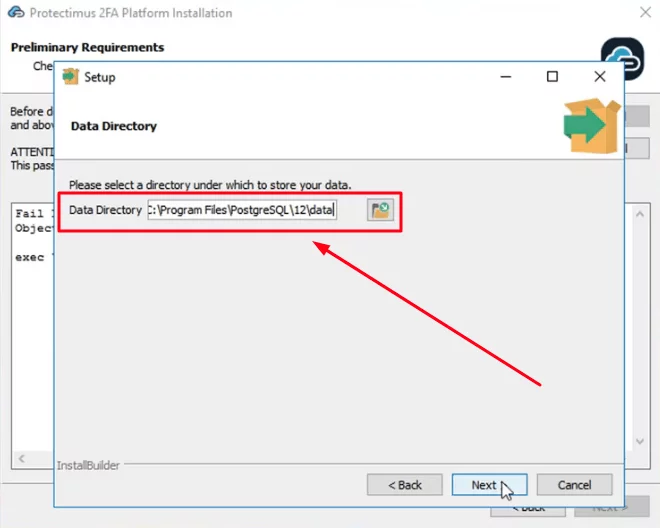
- Також на вашому сервері має бути встановлена система управління базами даних PostgreSQL (версія 9.2 і вище). Натисніть кнопку Install, щоб перевірити наявність PostgreSQL. Якщо її ще не встановлено, остання версія PostgreSQL буде встановлена автоматично.
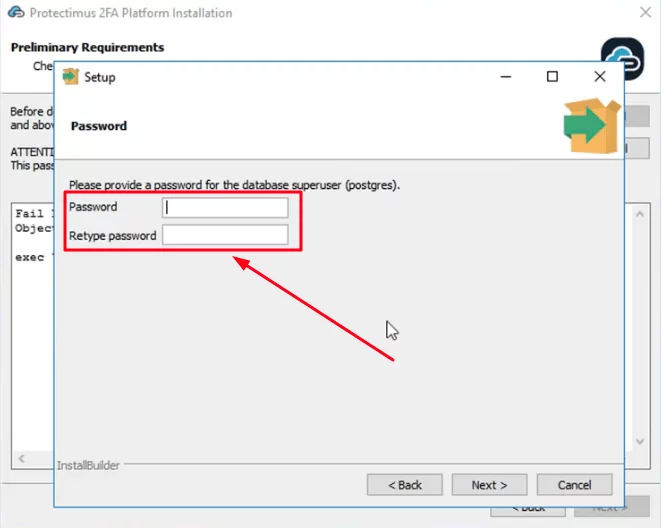
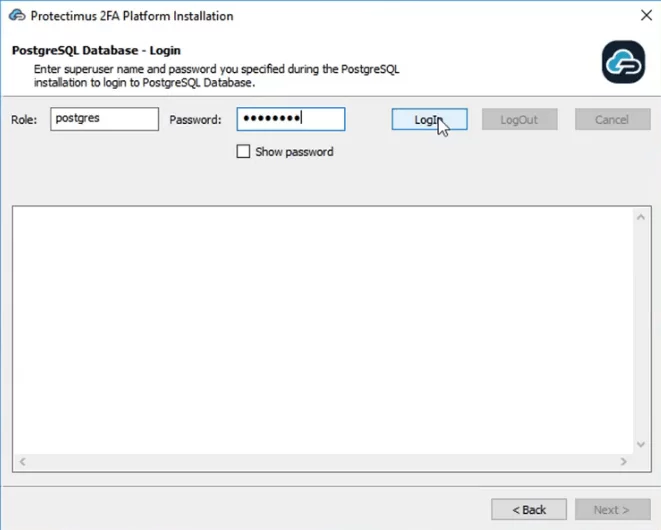
УВАГА: Під час інсталяції вам потрібно буде встановити ім’я та пароль суперкористувача. Цей пароль знадобиться вам для подальшого входу до PostgreSQL.
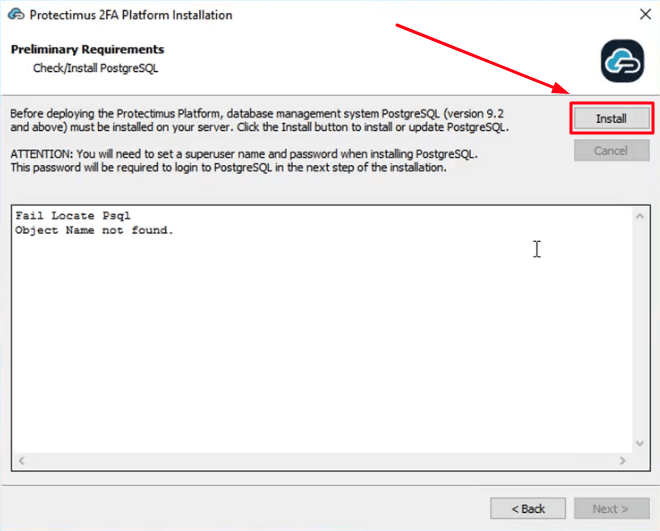
Будь ласка, запам’ятайте ім’я суперкористувача (postgres) і пароль, які ви додасте на цьому кроці. Ці ім’я та пароль знадобляться для подальшого входу до PostgreSQL.
- Увійдіть до бази даних PostgreSQL. Введіть ім’я та пароль суперкористувача, які ви вказали під час інсталяції PostgreSQL, і натисніть LogIn. Потім натисніть Next , щоб продовжити інсталяцію.
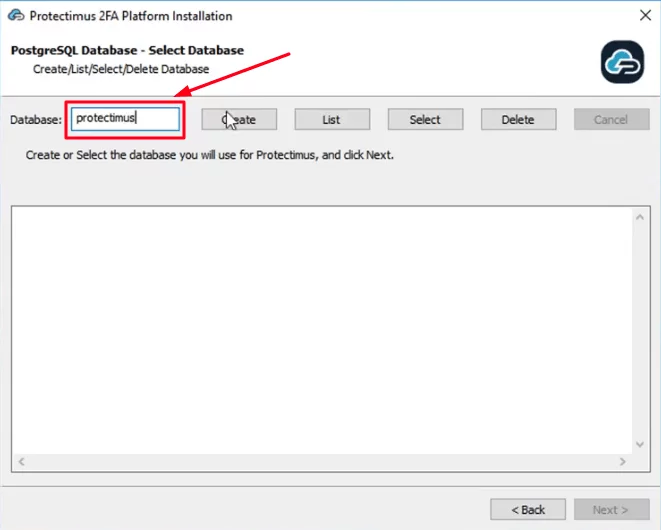
- Створіть і виберіть базу даних, яку ви будете використовувати для локальної платформи Protectimus.
- Створіть нову базу даних. Введіть бажану назву бази даних і натисніть кнопку Create.
- Перевірте, чи створено нову базу даних, за допомогою кнопки List.
- Натисніть кнопку Select, виберіть базу даних, яку ви щойно створили, і натисніть Next.
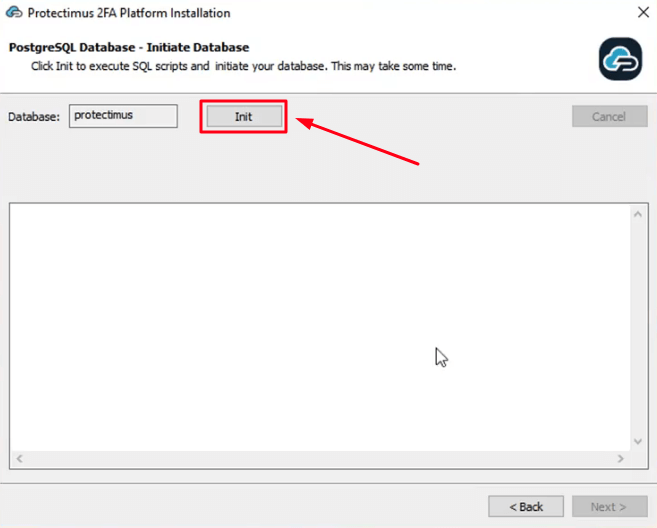
- Ініціюйте базу даних. Натисніть кнопку Init, щоб виконати SQL-скрипти та ініціювати базу даних. Це може зайняти деякий час.
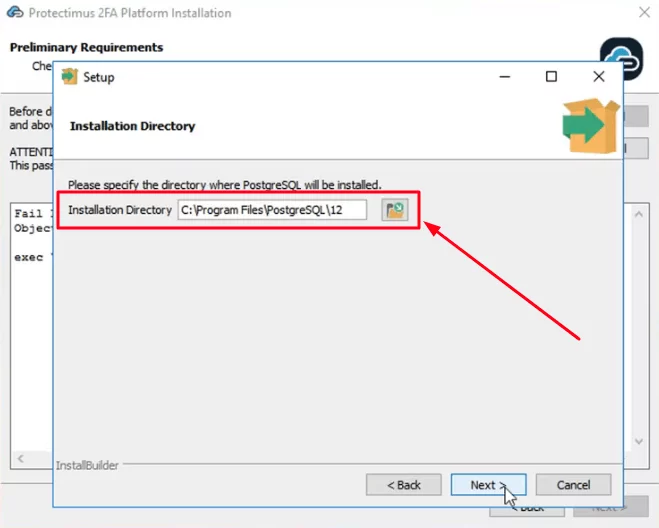
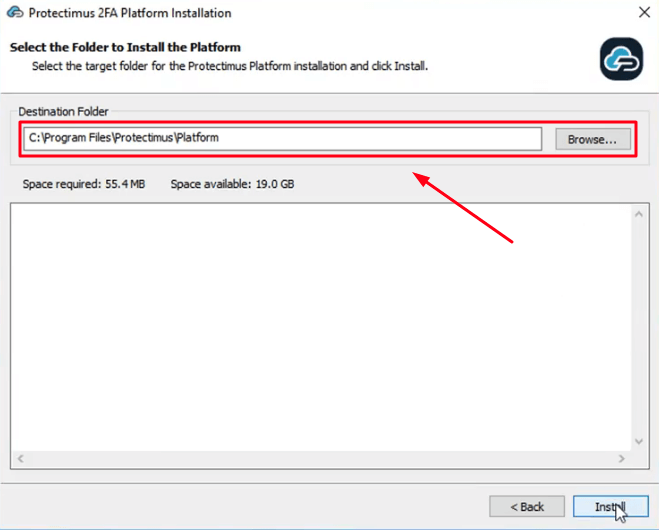
- Виберіть папку для встановлення платформи Protectimus і натисніть кнопку Install.
Сервер буде запущено на порту 8080 або 8443, а платформа буде доступна за адресою
http://localhost:8080 або
https://localhost:8443. Вона відкриється автоматично після встановлення. Після запуску платформи вам потрібно буде зареєструватися в системі.
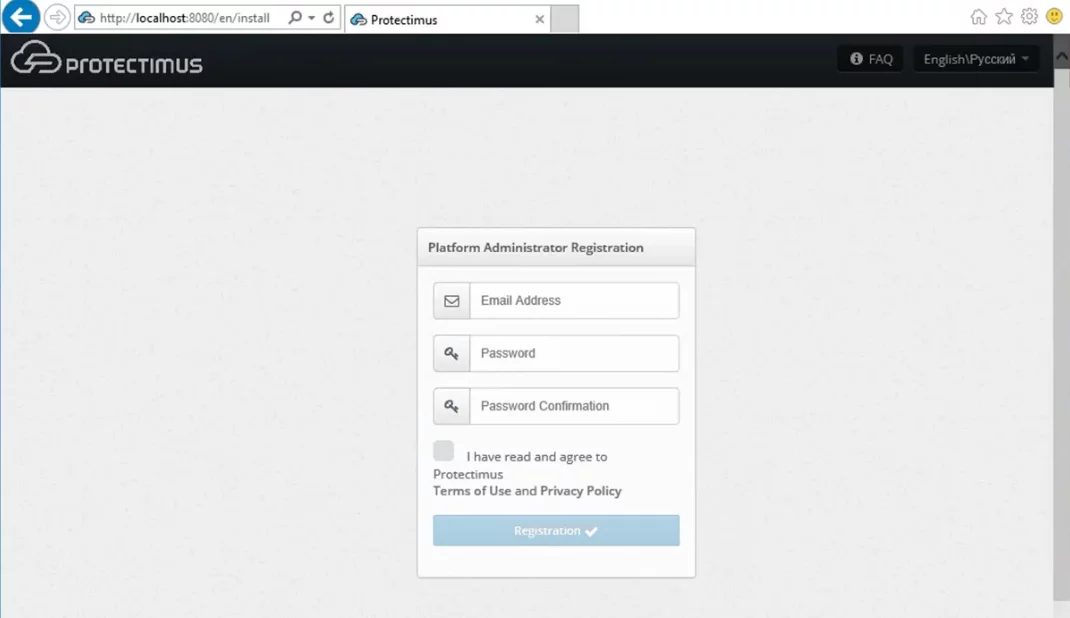
3. Як зареєструватися в системі Protectimus
Інсталятор автоматично відкриє реєстраційну форму на
http://localhost:8080 або
https://localhost:8443.Будь ласка, створіть обліковий запис і увійдіть, щоб налаштувати необхідні параметри.
4. Як оплатити та активувати ліцензію
Після успішного тестування платформи Protectimus вам потрібно буде отримати ліцензію. Для цього перейдіть на сайт
http://platform_path/licensing, оберіть потрібну вам опцію та отримайте ключ ліцензії.
За допомогою отриманого ключа ви можете оплатити та завантажити ліцензію онлайн. Для цього:
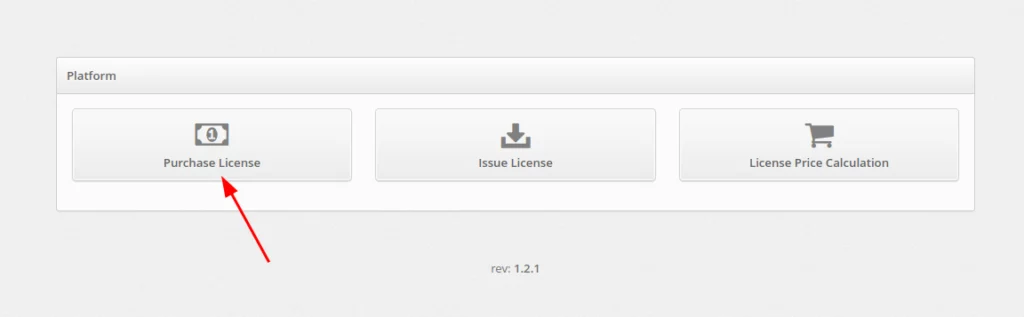
- Перейдіть на https://service.protectimus.com/en/platform і натисніть Придбати ліцензію (Purchase License).
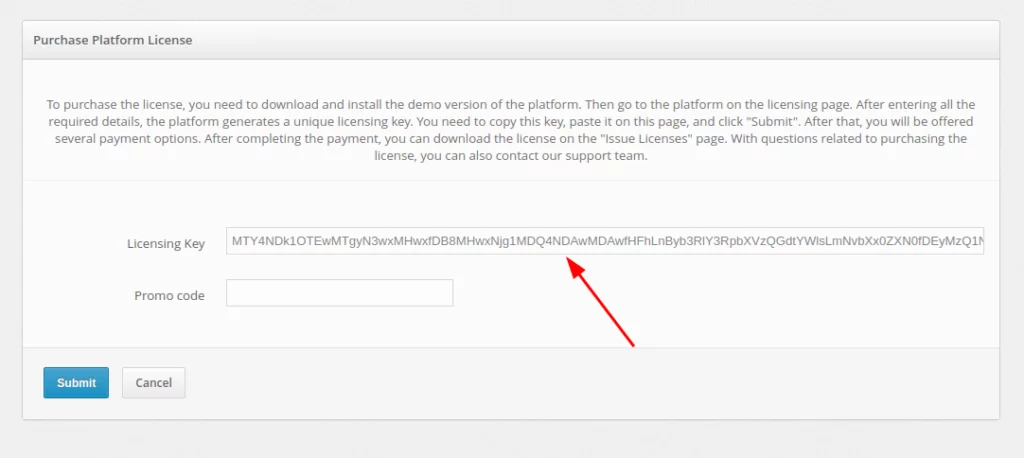
- Введіть ключ ліцензії у поле Ліцензійний ключ (Licensing Key) і натисніть кнопку Надіслати (Submit).
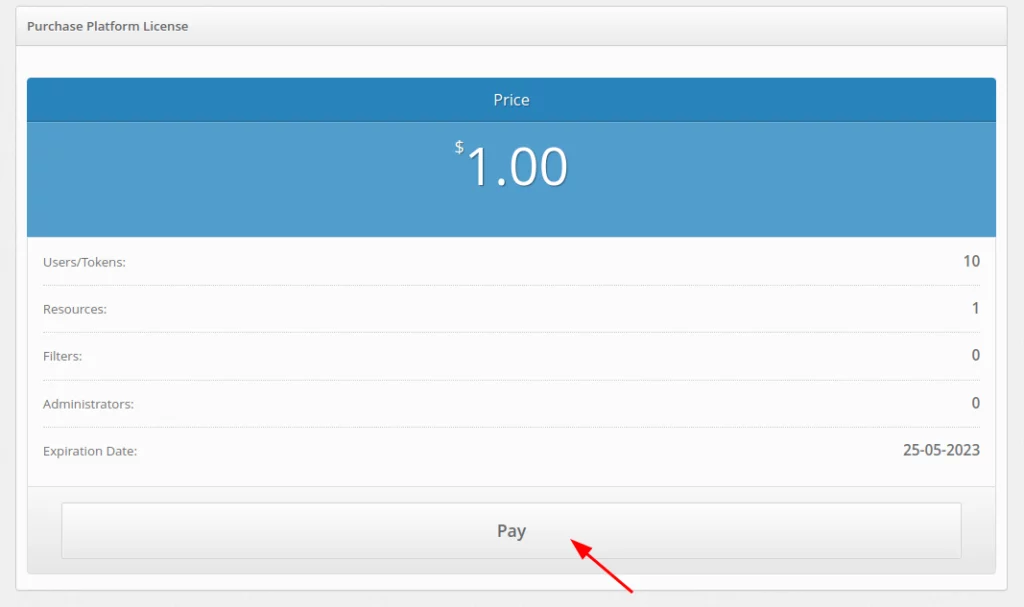
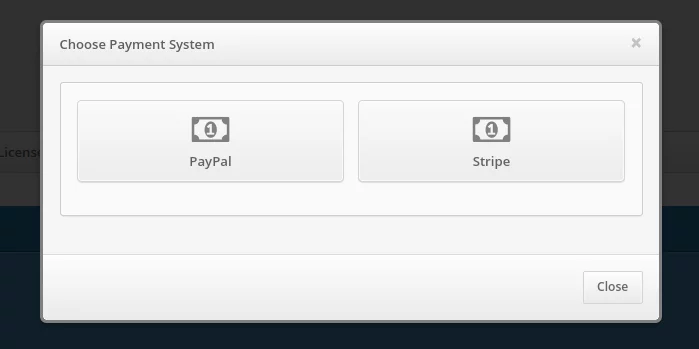
- На наступному кроці натисніть кнопку Оплатити (Pay).
- Виберіть спосіб оплати. Якщо вам потрібен альтернативний спосіб оплати, зверніться до служби підтримки Protectimus.
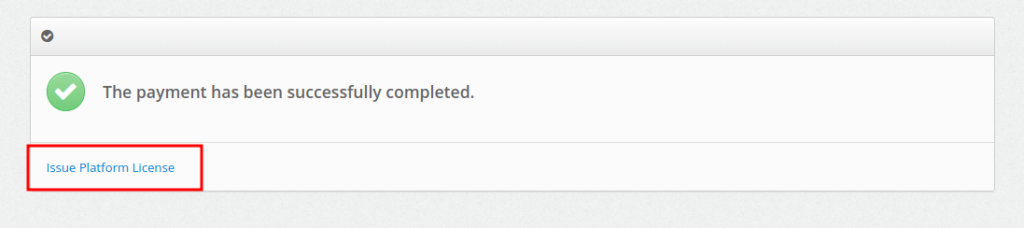
- Після успішної оплати натисніть на кнопку Видати ліцензію на платформу (Issue Platform License).
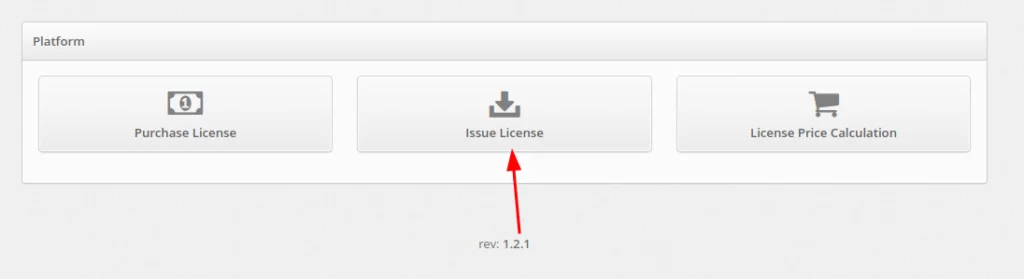
Ви також можете зробити це на сторінці https://service.protectimus.com/en/platform, натиснувши кнопку Видати ліцензію (Issue License).
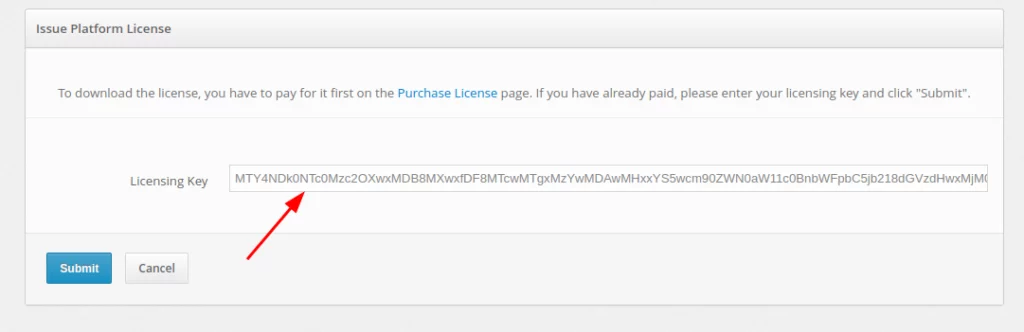
- Введіть ключ у поле Ліцензійний ключ і натисніть кнопку Надіслати. Після цього файл ліцензії буде завантажено.
- Після отримання файлу ліцензії завантажте його на сервер і вкажіть шлях до файлу ліцензії в параметрі licence.file.path, у файлі з назвою protectimus.platform.properties. Зверніть увагу, що шлях до файлу ліцензії слід вказувати з подвійними зворотними косими рисками
( наприклад: C:\\some\\path\\file ).
5. Як увімкнути синхронізацію з вашим каталогом користувачів
- Увійдіть у свій обліковий запис Protectimus і натисніть: Users – Synchronization – Add LDAP user provider
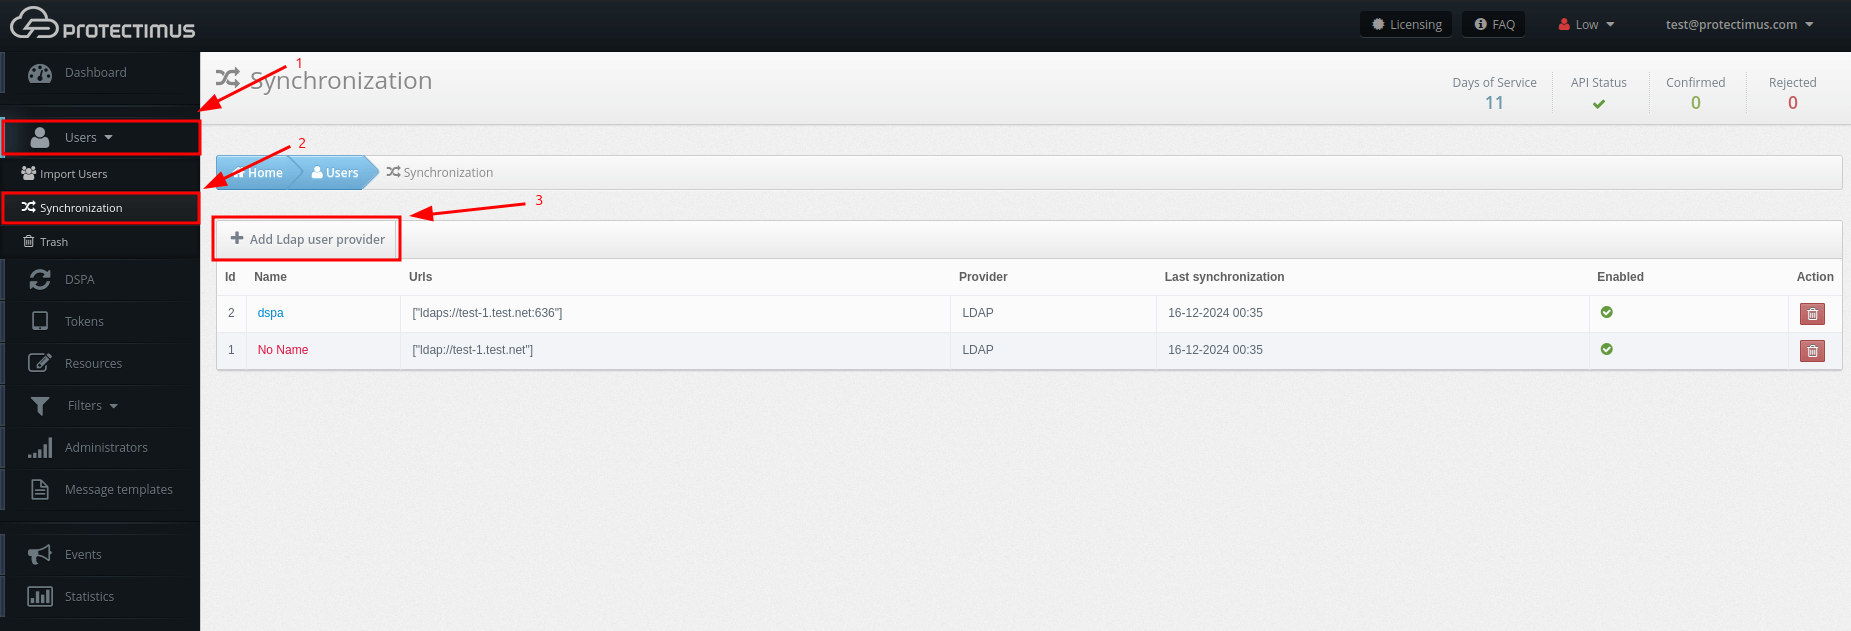
- У розділі Connection заповніть дані про ваш каталог користувачів.
Базові налаштування:
| Поле |
Значення |
Примітка |
| Connection URLs |
URL для підключення до вашого LDAP-сервера |
Приклад: ldaps://dc1.domain.local:636
Для DSPA потрібно використовувати LDAP-з’єднання, а також імпортувати SSL-сертифікат.
Стандартний спосіб:
keytool -import -alias ___ -file '___.cer' -keystore 'C:\Program Files\Java\jre___\lib\security\cacerts' -storepass changeit
|
| Base DN
| Повний DN каталогу, в якому зберігаються ваші користувачі |
Приклад:
DC=domain,DC=local
|
| Password |
Пароль вказаного користувача |
|
| User DN |
DN або userPrincipalName адміністратора або користувача, який має доступ до інформації про користувача |
Приклад:
CN=Administrator, CN=Users, DC=demo, DC=domain, DC=local
administrator@domain.local
Для DSPA користувач повинен мати права на зміну паролів
|
| Timeout (ms)
| Тайм-аут з’єднання |
|
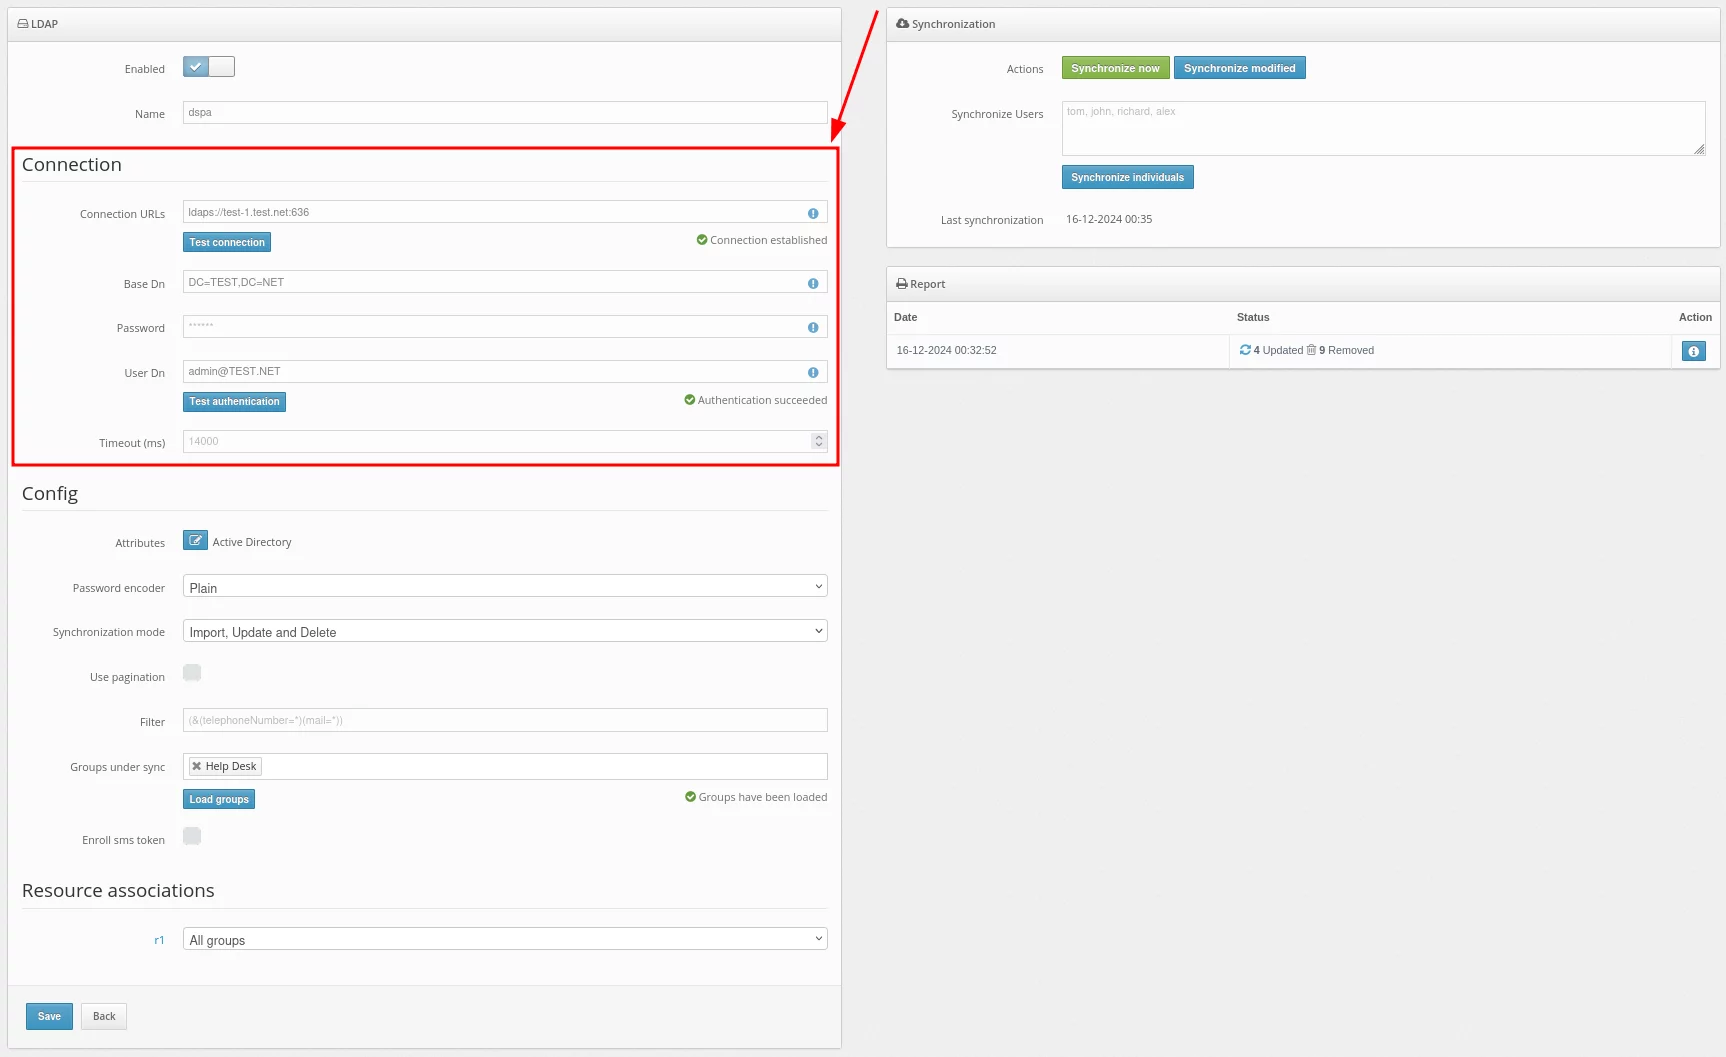
- Заповнивши дані про каталог користувачів, додайте атрибути синхронізації.
Натисніть на кнопку Attributes.
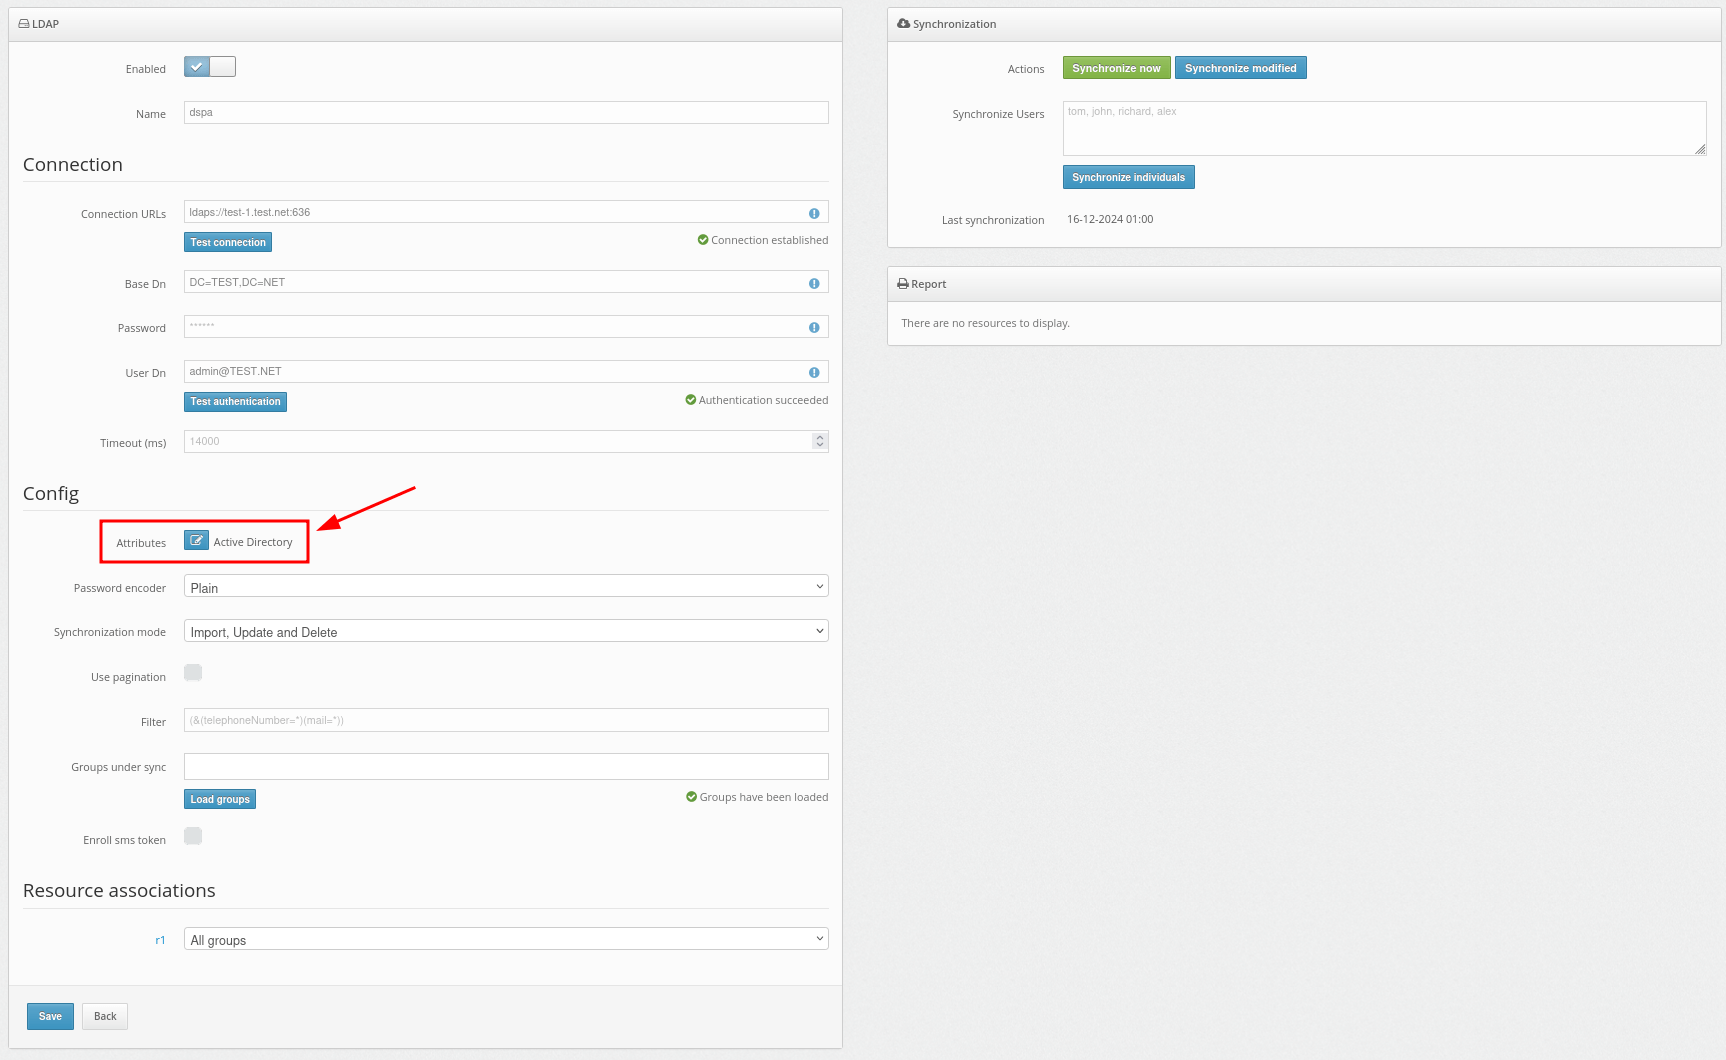
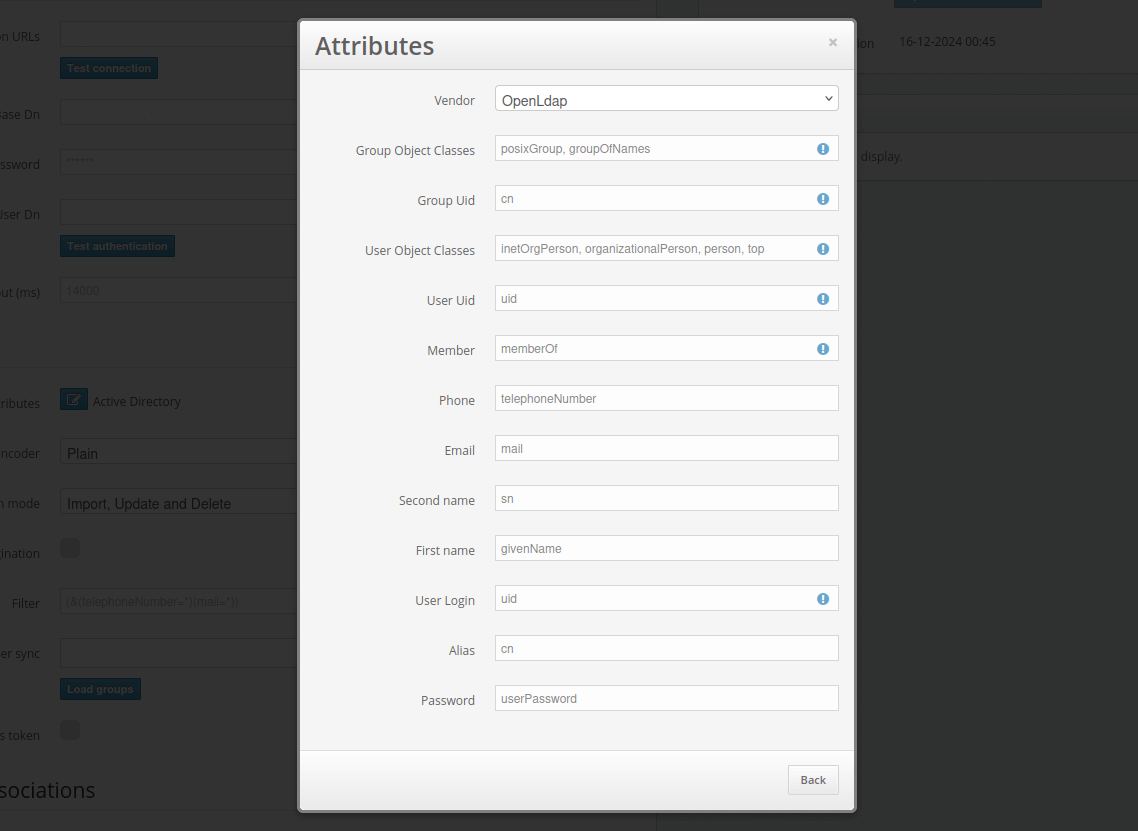
Потім додайте свої атрибути, як показано в прикладі.
Крім того, ви можете налаштувати OpenLDAP – для цього виберіть його у списку постачальників у полі Vendor.
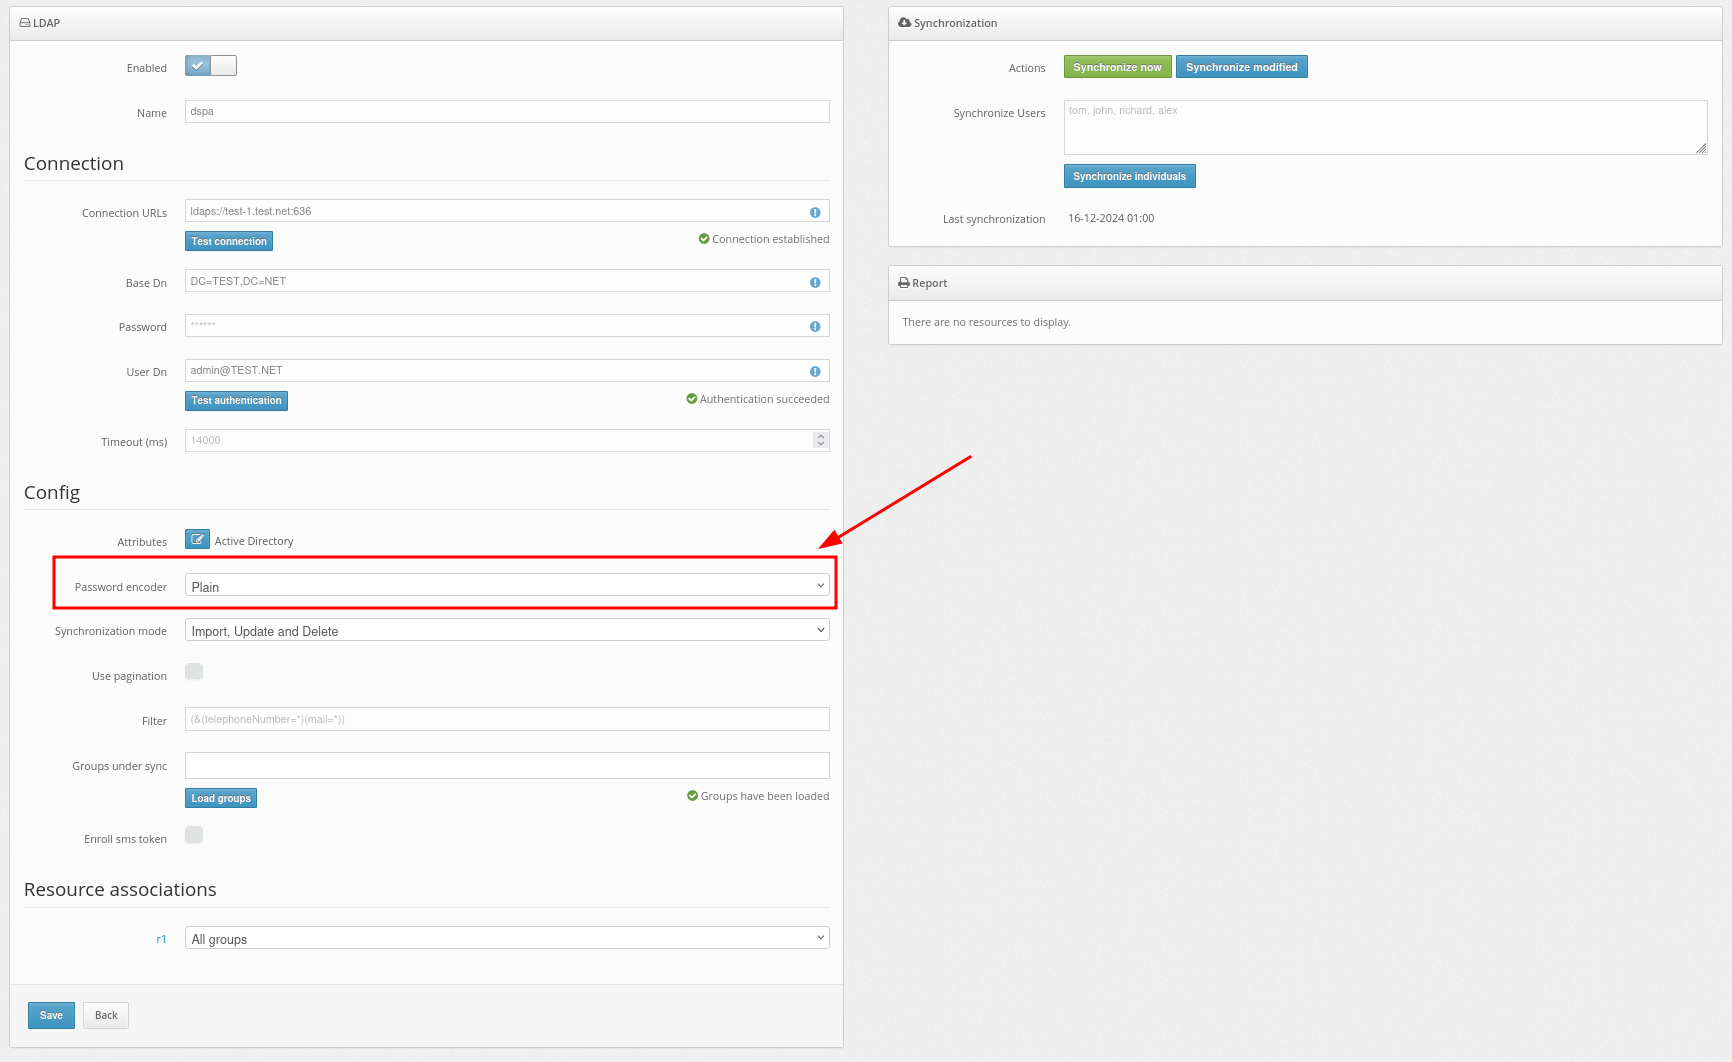
- Тепер налаштуйте параметр Password Encoder.
Виберіть алгоритм, який відповідає вашій конфігурації. Доступні алгоритми: AD-specific (UTF-16LE), Plain, BCRYPT, SHA256, SSHA256, SHA512, SSHA512, MD4, MD5, SMD5, SHA, and SSHA.
- Після того, як ви успішно додали провайдера, потрібно імпортувати користувачів у систему Protectimus і синхронізувати їх із каталогом користувачів.
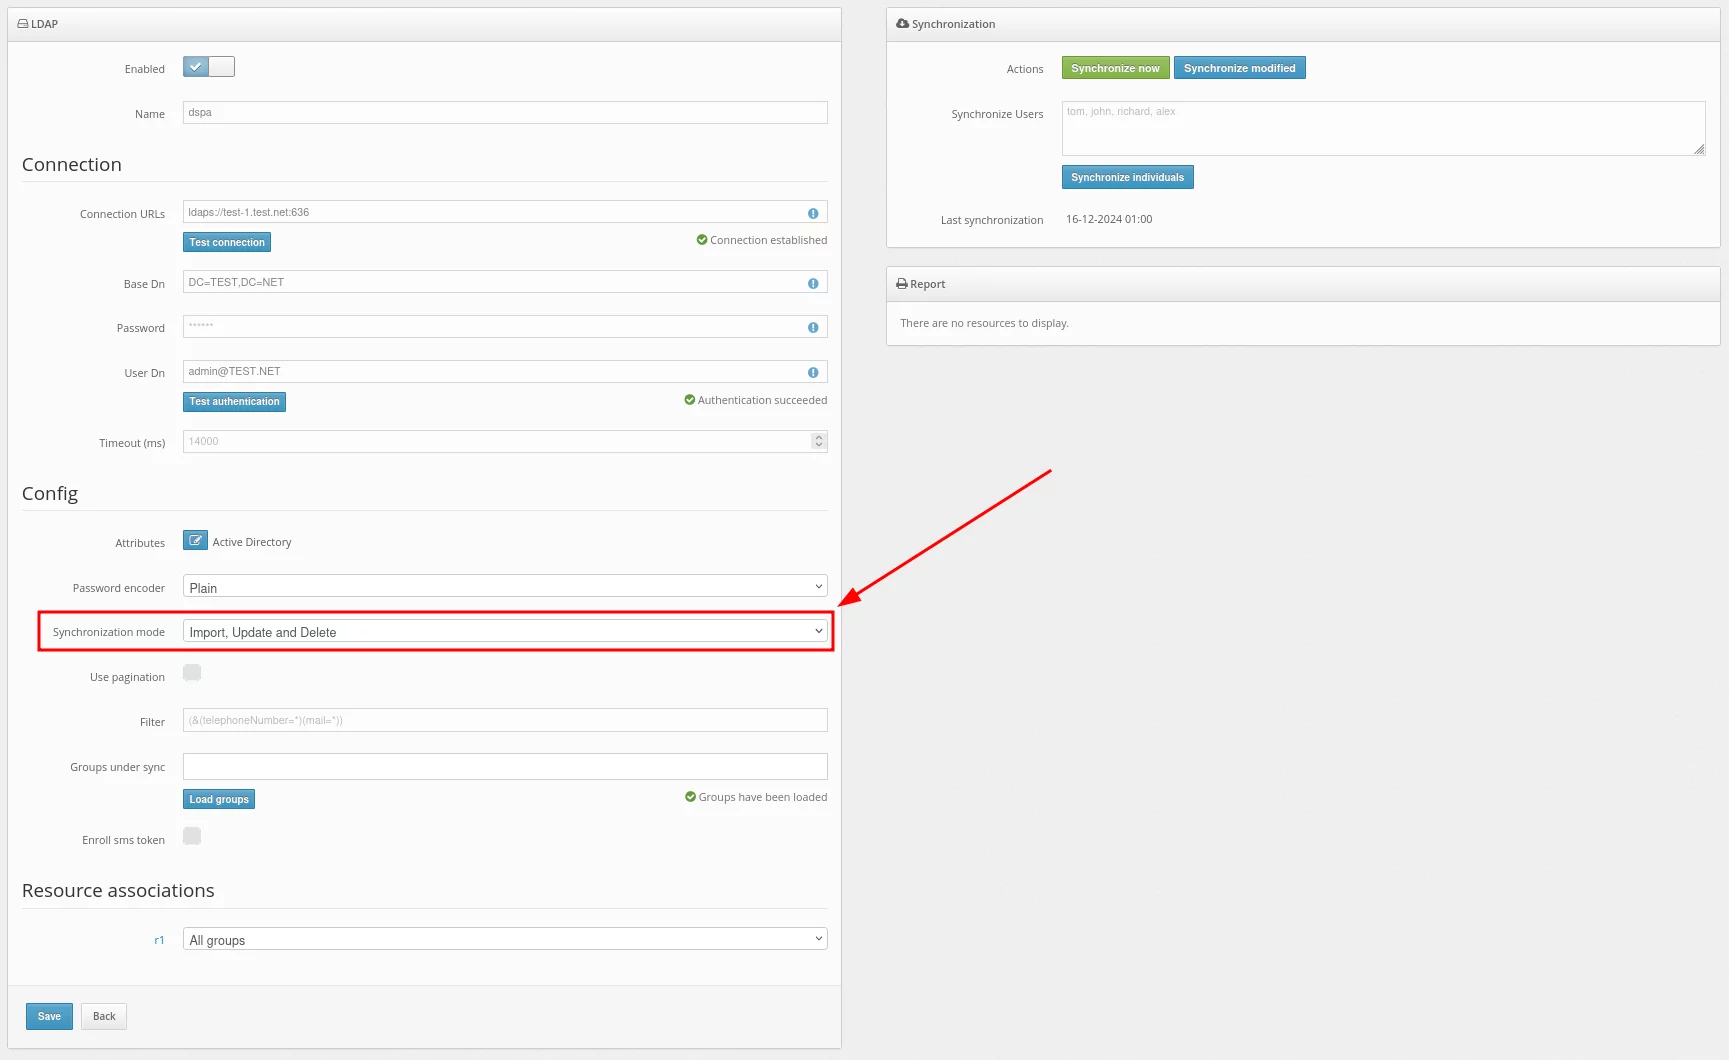
У полі Synchronization mode ви повинні вибрати спосіб імпорту користувачів.
Імпорт користувачів можна налаштувати трьома способами:
- Import – ніколи не буде оновлювати дані користувача.
- Import and Update – завжди оновлюватиме дані користувача, коли це можливо.
- Import, Update and Delete – завжди оновлюватиме дані користувача, коли це можливо. Користувачі Protectimus, а також призначені їм програмні токени будуть видалені при видаленні користувача із зовнішнього каталогу користувачів.
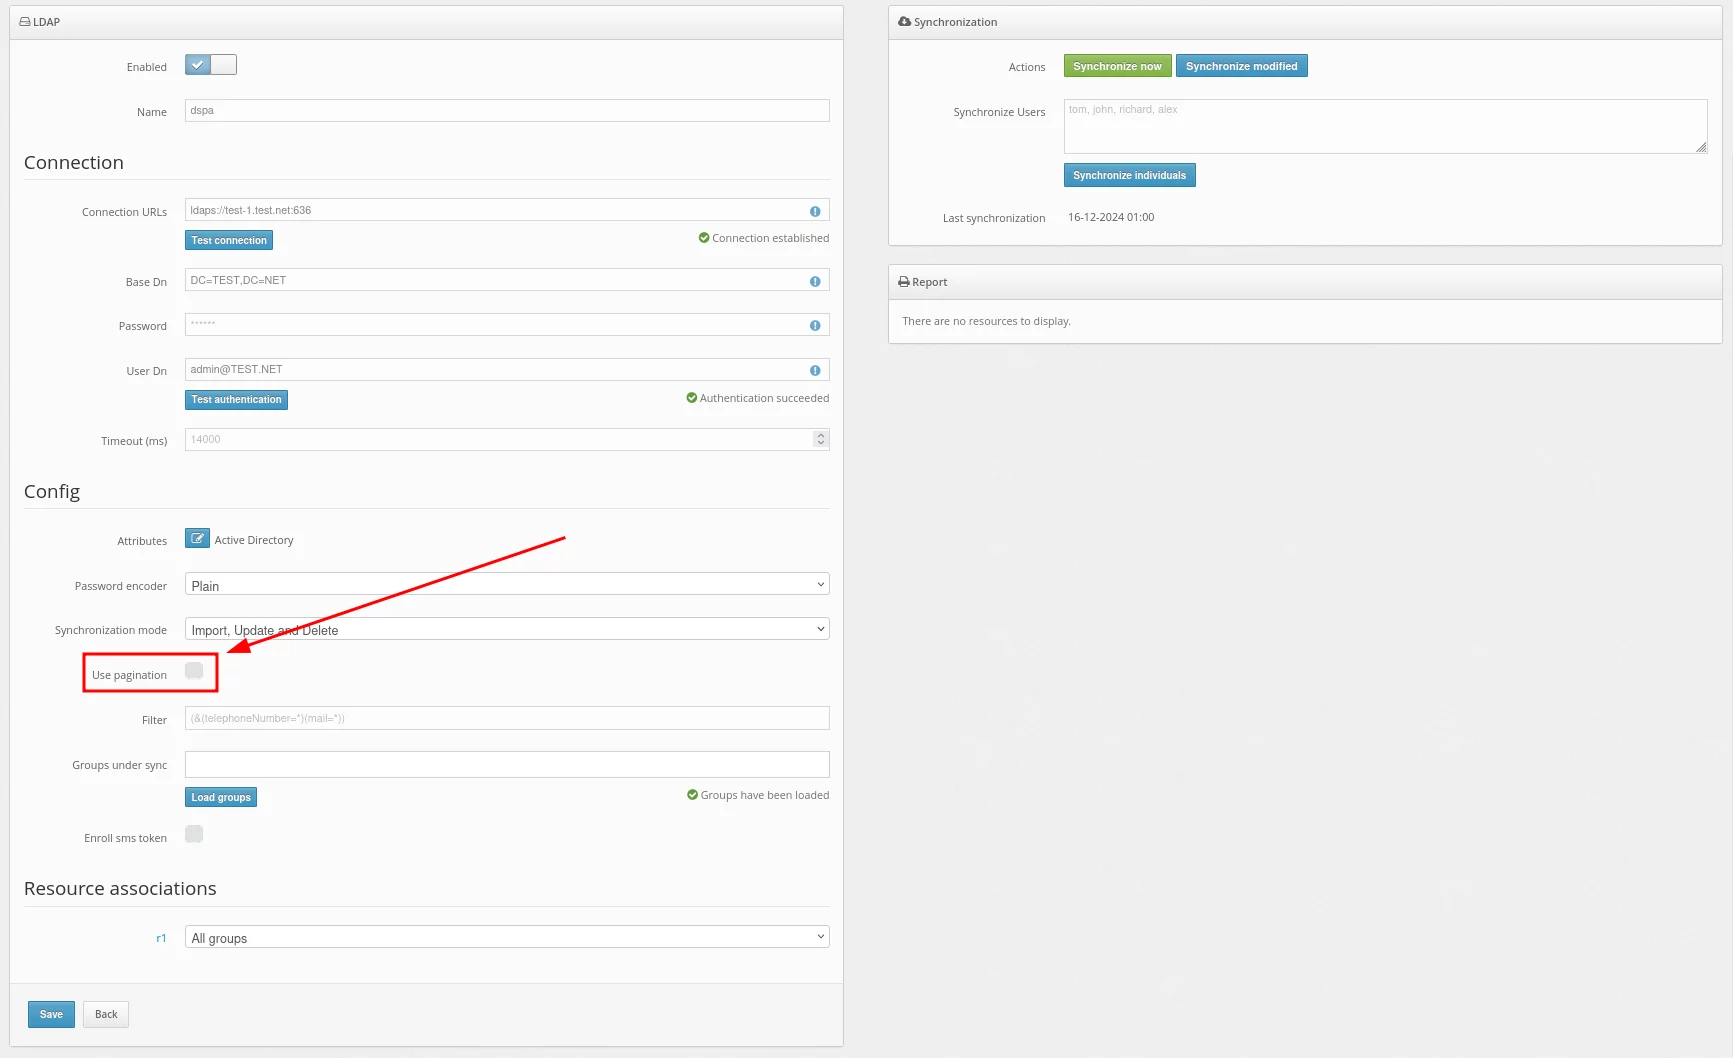
- Тепер налаштуйте параметр Use pagination.
Коли активовано параметр Use pagination, це означає, що якщо кількість записів перевищує 200 або 500, для пошуку буде використано декілька запитів. Це пов’язано з тим, що за замовчуванням LDAP зазвичай повертає обмежену кількість записів.
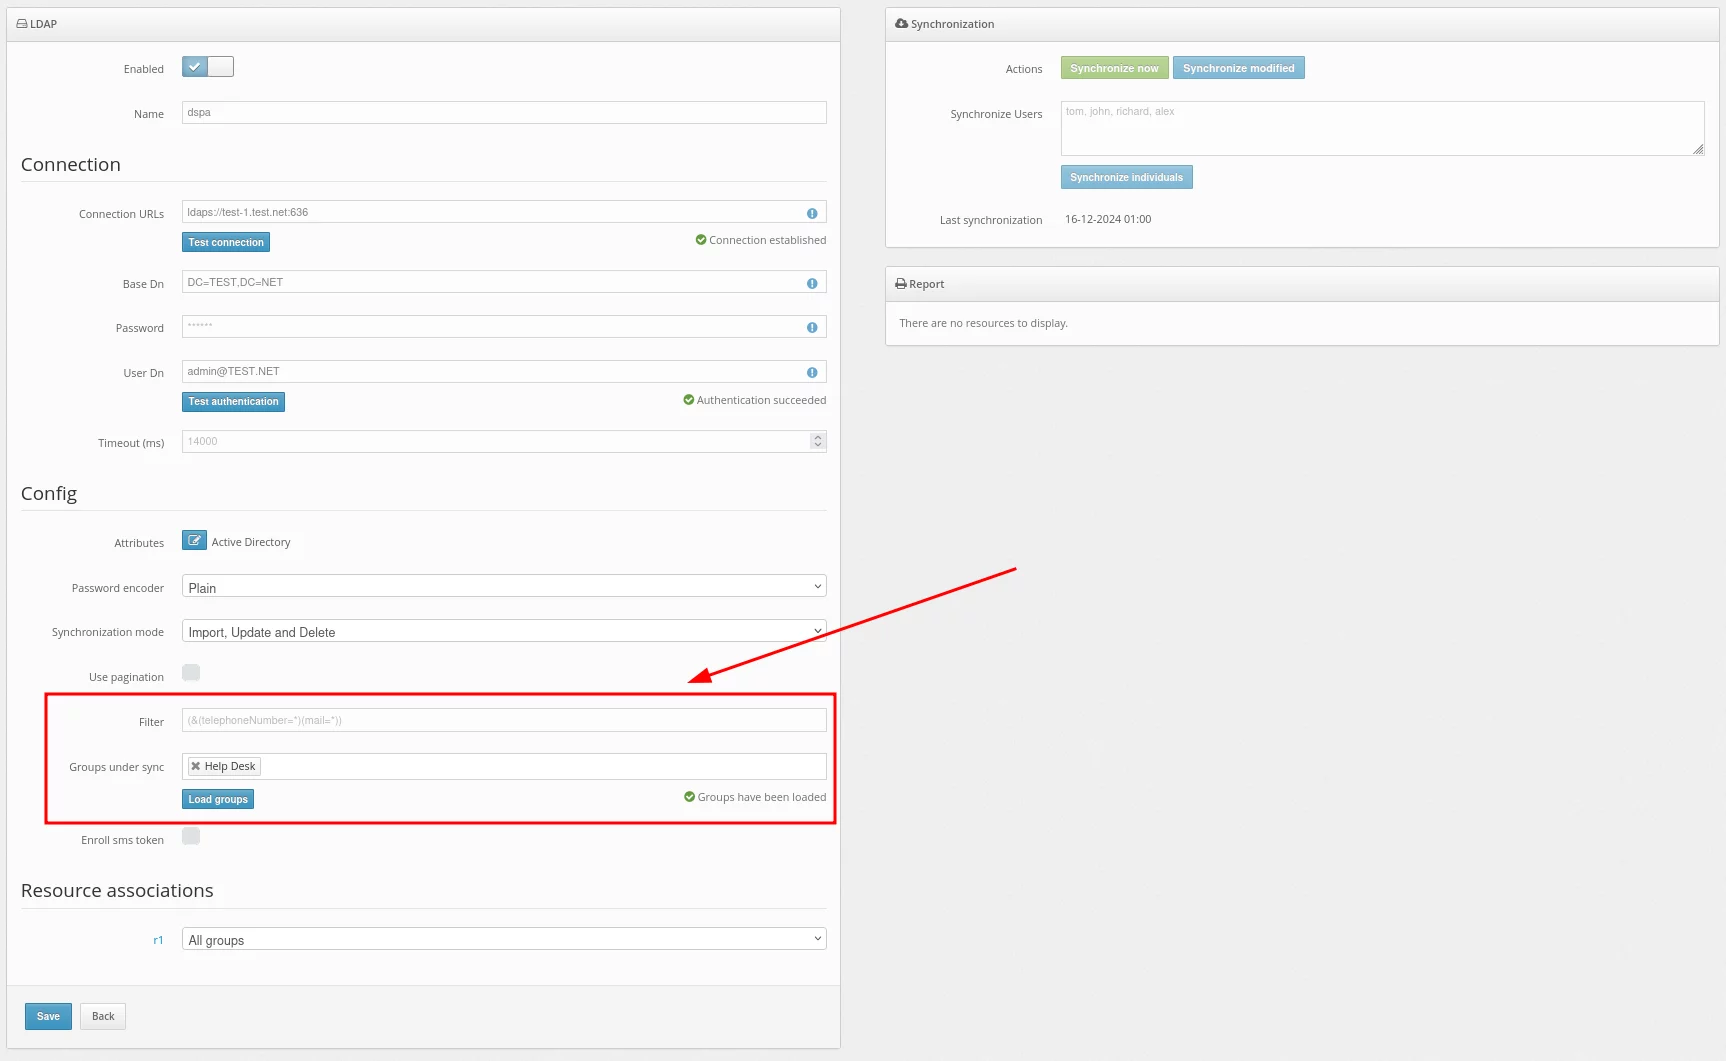
- Налаштуйте фільтр, який буде застосовано під час синхронізації.
Використовуйте цей фільтр, щоб вибрати тільки тих користувачів, яких ви хочете синхронізувати.
Наприклад, щоб імпортувати тільки тих користувачів, у яких вказані атрибути telephoneNumber і mail, налаштуйте такий фільтр:
(&(telephoneNumber=*)(mail=*))
Щоб імпортувати користувачів з певної групи, виберіть потрібну групу. У нашому прикладі це група Users.
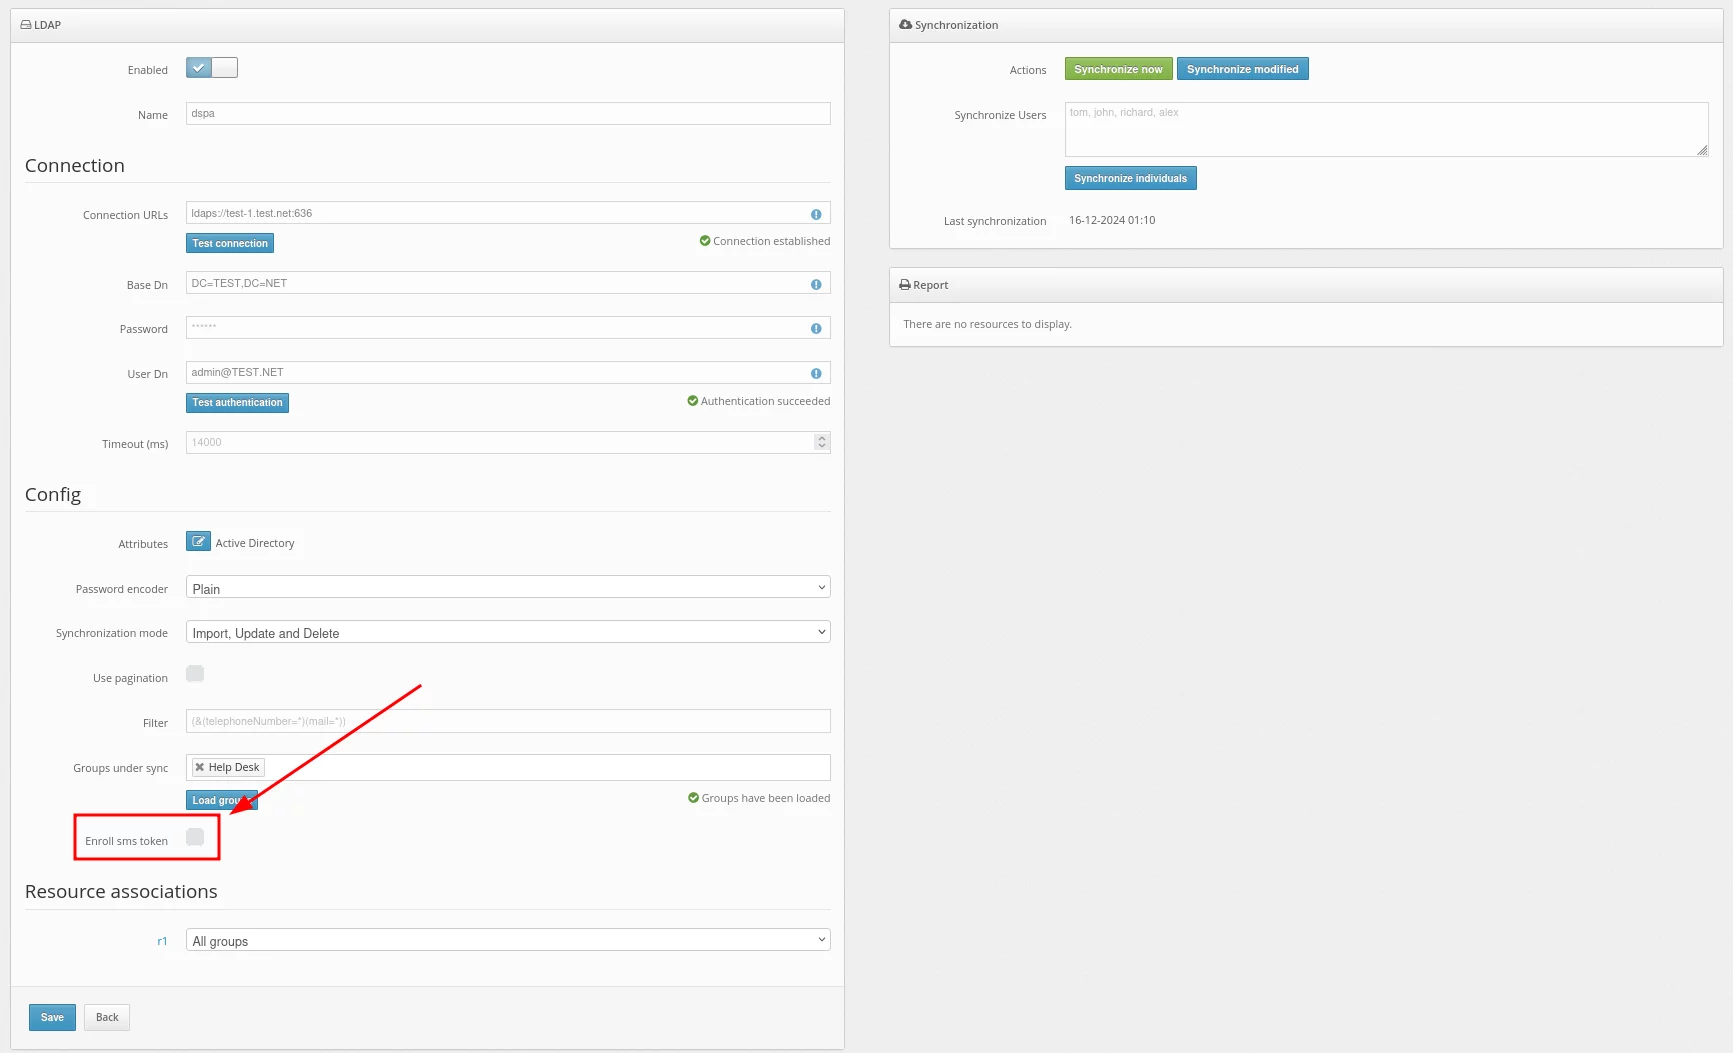
- Тепер налаштуйте параметр Enroll SMS token.
Коли опція Enroll SMS token активована, SMS-токени будуть випущені і призначені вашим користувачам під час синхронізації.
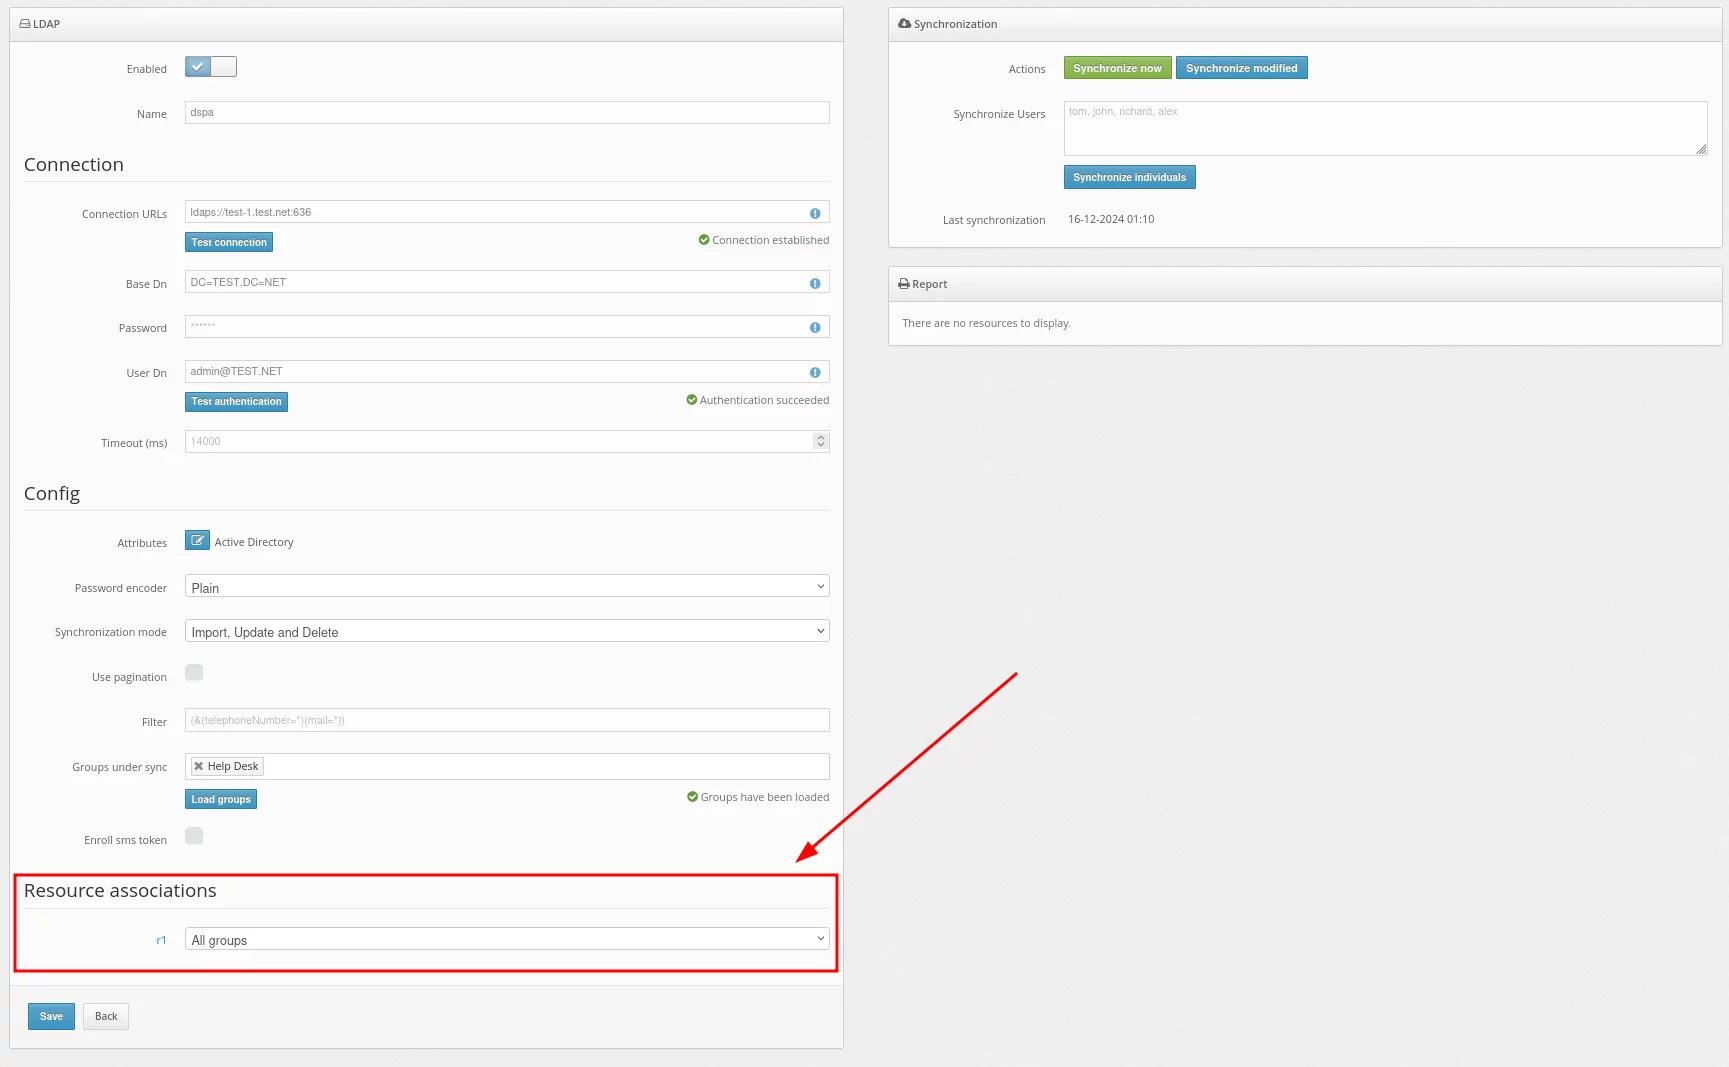
- У розділі Resource associations ви можете вибрати ресурс, до якого будуть прикріплені користувачі під час синхронізації.
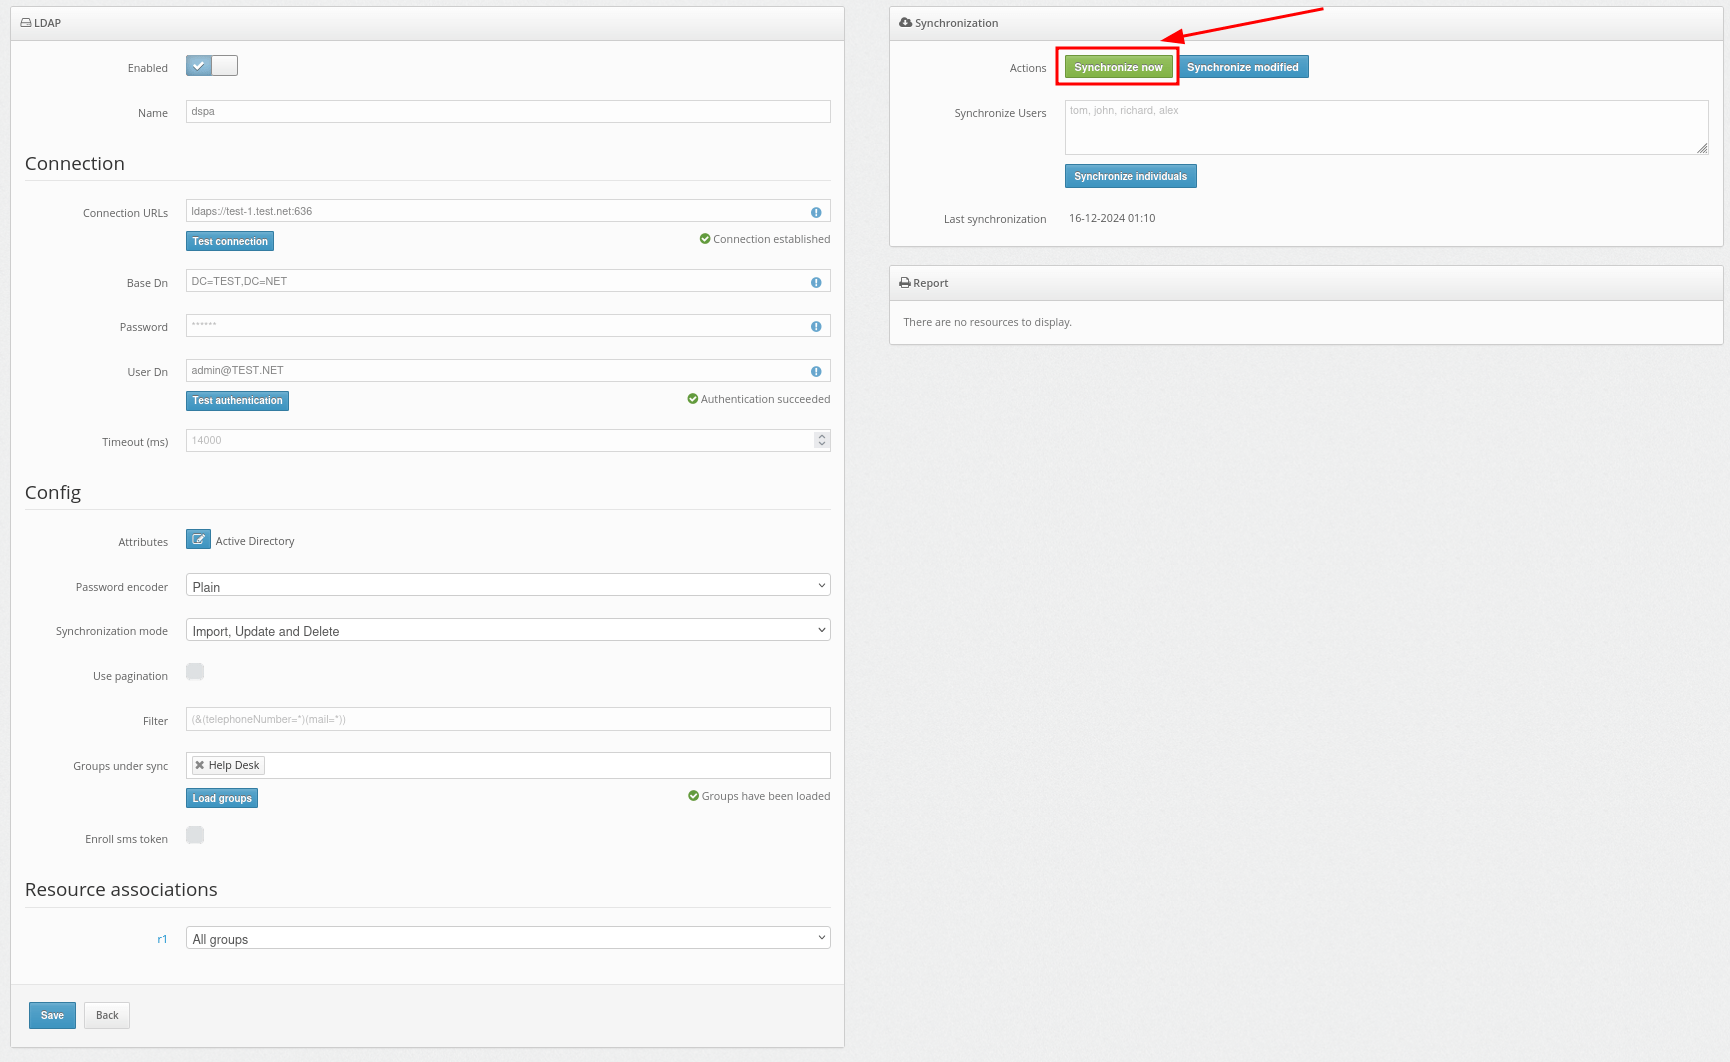
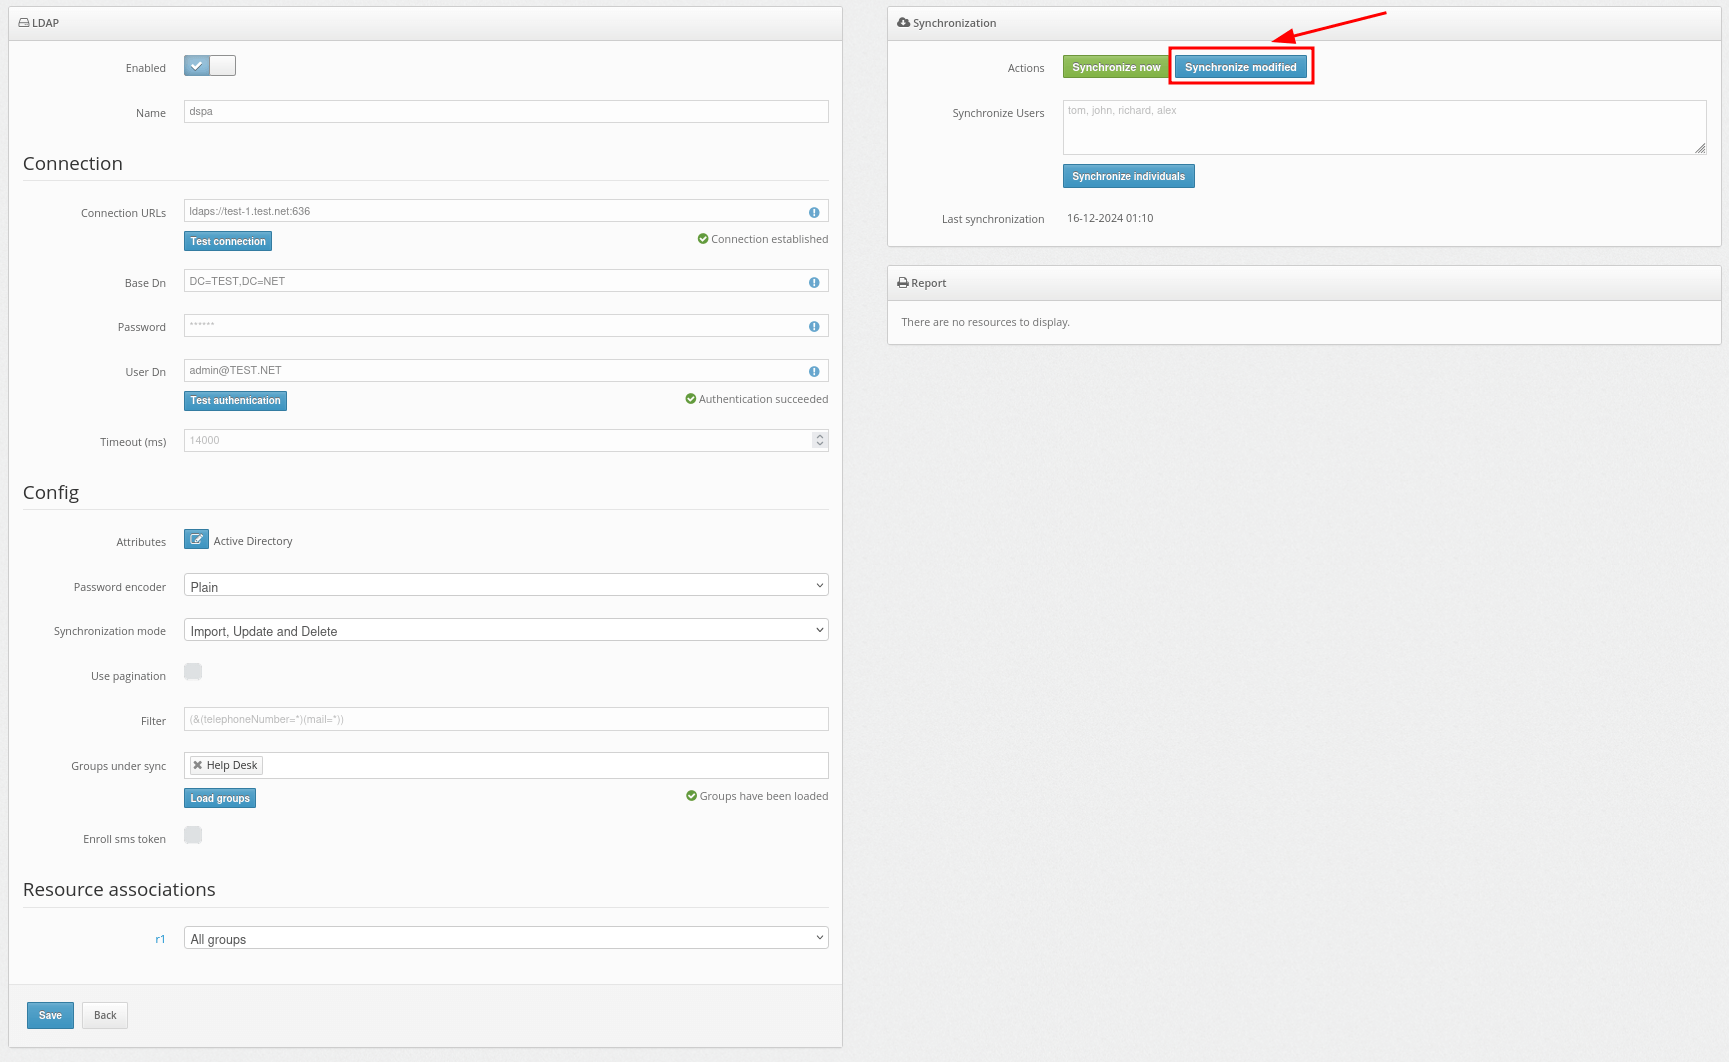
- Наступний крок – увімкнути синхронізацію користувачів. Це можна зробити трьома способами:
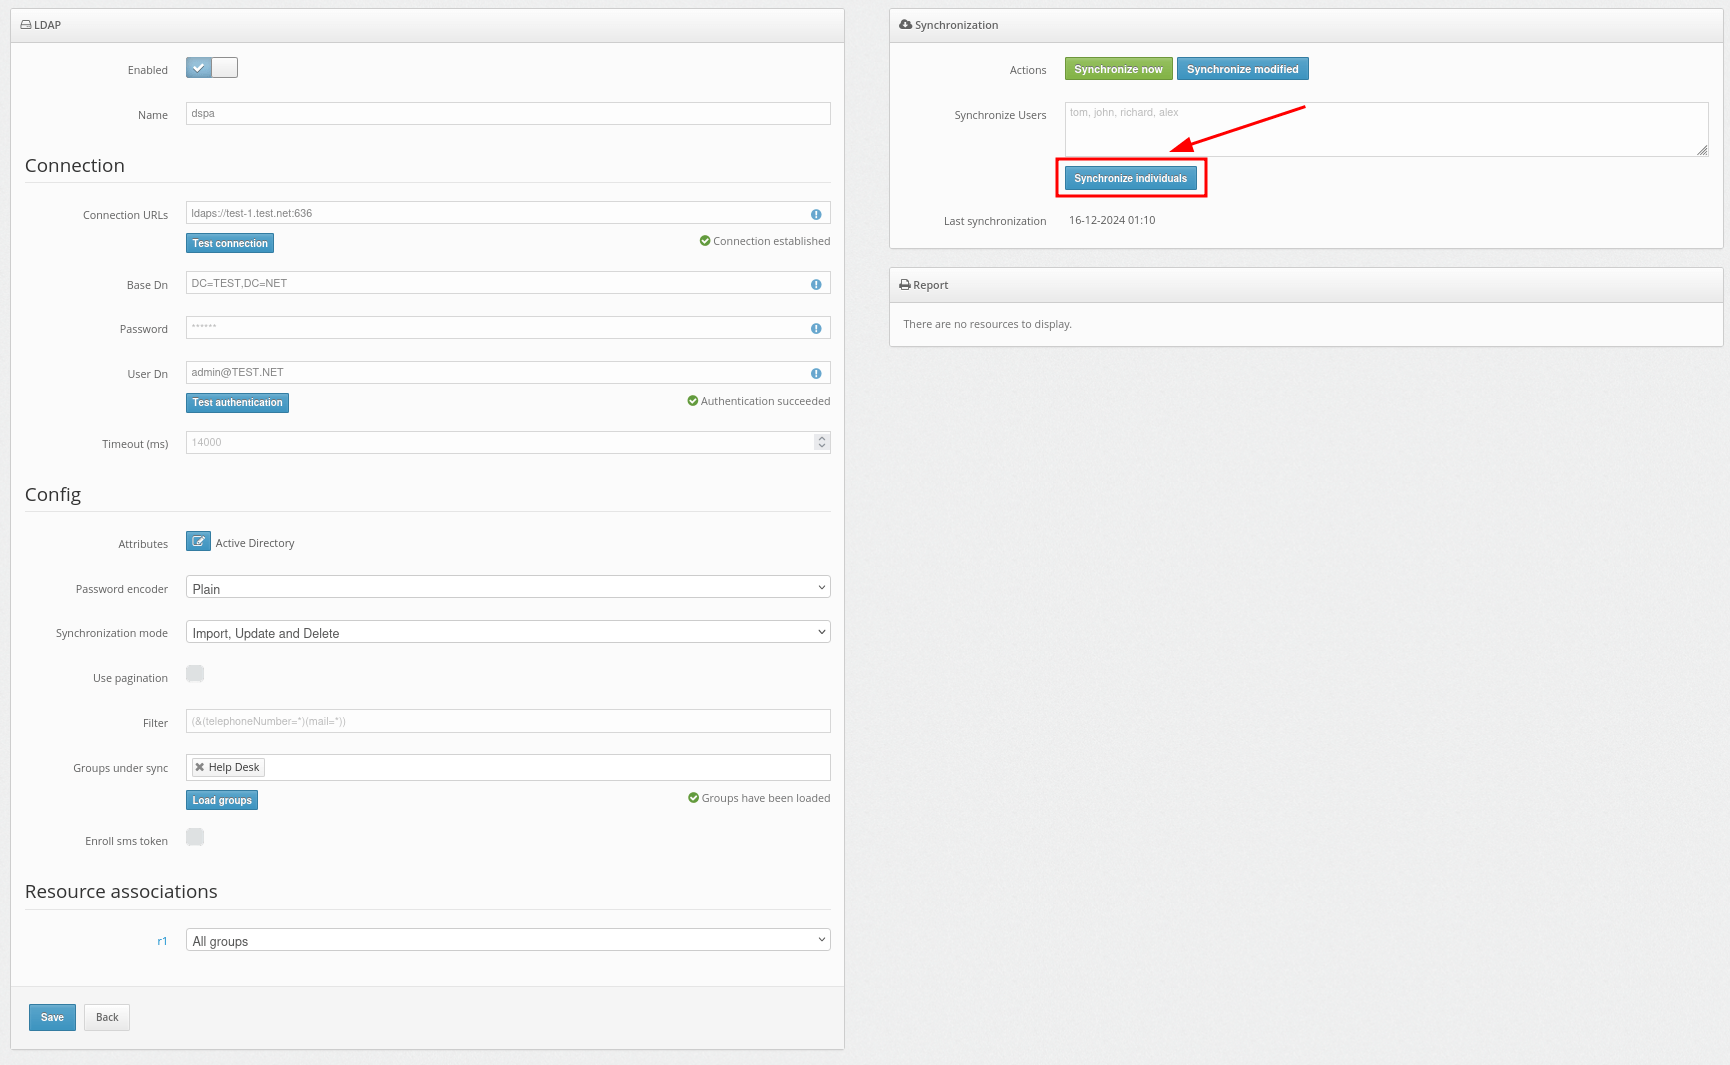
- Використайте кнопку Synchronize now, щоб синхронізувати всіх користувачів одночасно.
Ви також можете вибрати кнопку Synchronize modified, щоб синхронізувати тільки тих користувачів, які були змінені з моменту останньої синхронізації.
- Використовуйте функцію Synchronize individuals, щоб синхронізувати лише обраних користувачів з вашого каталогу користувачів.
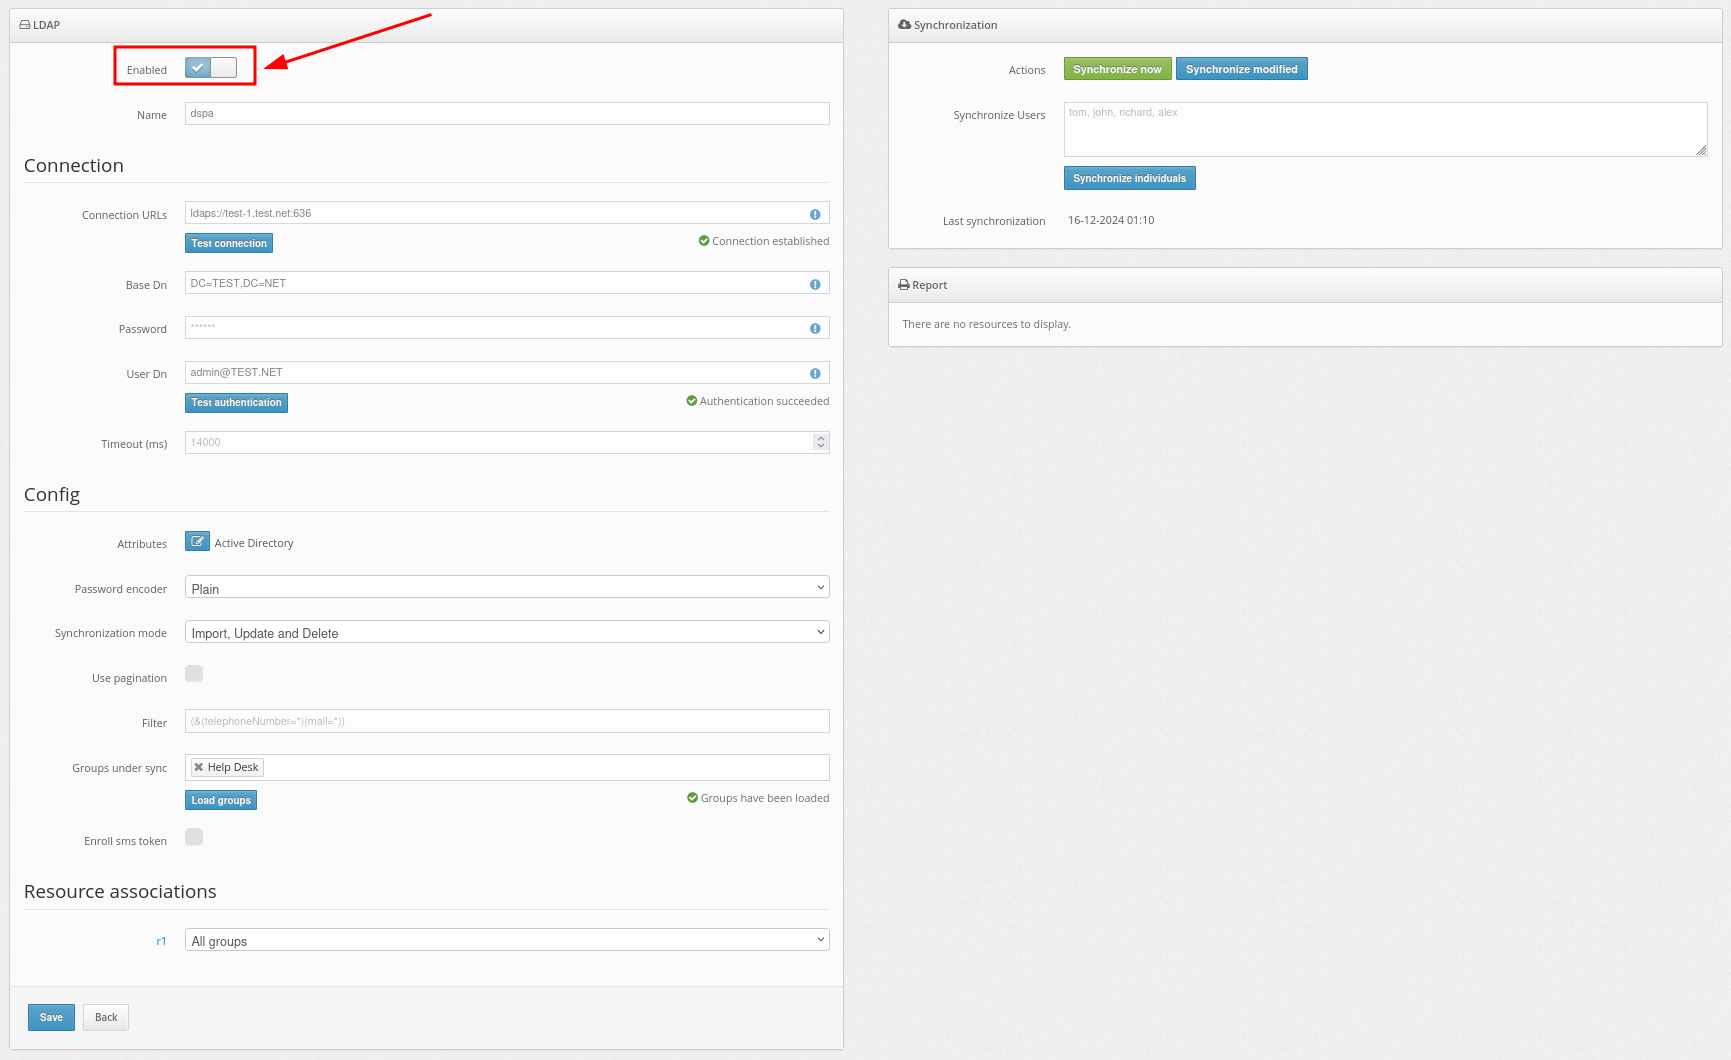
- Або увімкніть автоматичну синхронізацію користувачів, активувавши опцію Enabled вгорі сторінки.
6. Як налаштувати основні параметри
Базові налаштування, необхідні для роботи платформи двофакторної автентифікації Protectimus, включають в себе наступні:
- Додавання ресурсу.
- Додавання користувачів. Ви можете увімкнути синхронізацію користувачів з вашим каталогом або додати/імпортувати користувачів вручну.
- Додавання OTP токенів.
ЗВЕРНІТЬ УВАГУ: Якщо ви плануєте використовувати токени Protectimus BOT, Protectimus MAIL або Protectimus SMS для доставки одноразових паролів своїм користувачам, дотримуйтесь наступних інструкцій, щоб налаштувати ці методи доставки OTP:
Крім того, ви можете увімкнути Портал самообслуговування користувачівякий дозволить користувачам самостійно випускати, реєструвати та керувати своїми токенами.
- Призначення токенів користувачам;
- Призначення токенів з користувачами на ресурс.
Також доступні деякі додаткові функції:
7. Як інтегрувати та налаштувати локальну платформу Protectimus
Інтегруйте локальну MFA-платформу Protectimus з системою, яку ви хочете захистити за допомогою двофакторної автентифікації. Для цього знайдіть відповідну інструкцію з інтеграції на
сторінці Інтеграції.
Якщо ви не можете знайти потрібну інструкцію або маєте запитання, зверніться до нашої служби
підтримки – ми будемо раді допомогти вам з інтеграцією.