Програмований апаратний TOTP-токен у форматі карти
Класичні апаратні TOTP-токени SHA-1 з попередньо встановленими секретними ключами
Програмований апаратний TOTP-токен у форматі брелока
Класичний апаратний TOTP-токен з підтримкою алгоритму SHA-256
Безкоштовний застосунок для двофакторної автентифікації з хмарним бекапом, простим перенесенням токенів на новий телефон, PIN-кодом і біометричною автентифікацією
Безкоштовна доставка OTP через чат-ботів у месенджерах
Доставка одноразових паролів за допомогою SMS-повідомлень
Безкоштовна доставка одноразових паролів електронною поштою
Доставка одноразових паролів через push-повідомлення
Інструкції
Налаштуйте двофакторну автентифікацію (2FA) для pfSense OpenVPN за допомогою системи багатофакторної автентифікації Protectimus.
Багатофакторна автентифікація (MFA) є важливою складовою кібербезпеки, яка захищає облікові записи користувачів, інфраструктуру та конфіденційну інформацію від несанкціонованого доступу. Інтегруючи 2FA в pfSense OpenVPN, зменшується ймовірність таких загроз, як атаки методом перебору паролів, кейлогери, підміна даних, фішинг, атаки типу MITM та соціальна інженерія.
Protectimus забезпечує безпечний доступ до pfSense OpenVPN, підключаючи багатофакторну автентифікацію (MFA) через Protectimus RADIUS Server.
Наступна схема ілюструє процес роботи рішення Protectimus, розробленого для впровадження двофакторної автентифікації на pfSense OpenVPN.
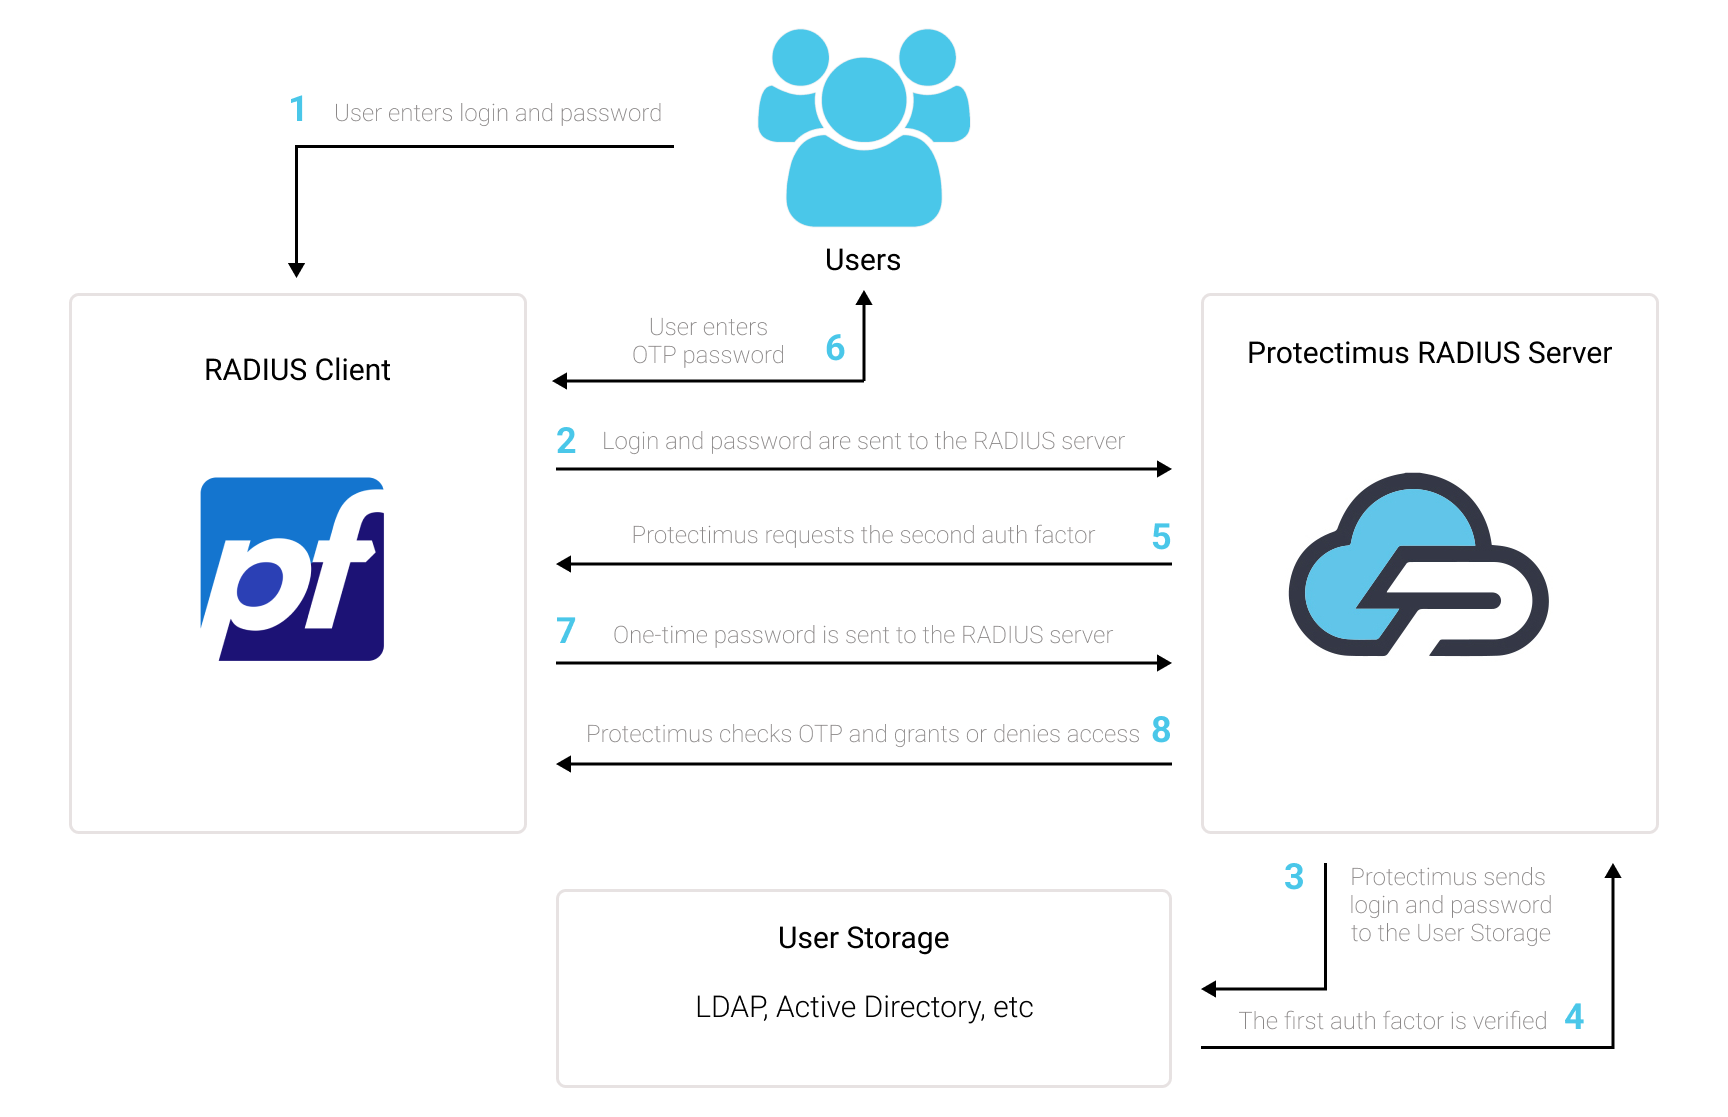
Двофакторна автентифікація від Protectimus підвищує безпеку pfSense OpenVPN, додаючи додатковий рівень захисту, який ефективно запобігає будь-яким несанкціонованим спробам доступу до вашого VPN.
Після активації двофакторної автентифікації (2FA) для pfSense OpenVPN користувачі будуть змушені проходити два етапи автентифікації для доступу до своїх облікових записів.
При спробі доступу до своїх облікових записів pfSense OpenVPN, захищених 2FA/MFA, користувачі повинні будуть вказати:
Щоб зламати pfSense OpenVPN, захищений двофакторною автентифікацією (2FA/MFA), зловмисник має одночасно отримати як звичайний пароль, так і одноразовий пароль протягом лише 30 секунд, поки той ще активний. Ця складна задача підкреслює виняткову ефективність двофакторної автентифікації проти більшості спроб злому.
Ви можете налаштувати двофакторну автентифікацію (2FA) для pfSense OpenVPN за допомогою Protectimus, використовуючи протокол RADIUS:
- Зареєструйтесь у SAAS сервісі Protectimus або встановіть локальну платформу Protectimus та налаштуйте основні параметри.
- Встановіть та налаштуйте Protectimus RADIUS Server.
- Додайте Protectimus як RADIUS сервер для pfSense OpenVPN.
Докладні інструкції щодо встановлення та налаштування Protectimus RADIUS Server доступні в нашому Посібнику з налаштування Protectimus RADIUS Server для OpenVPN pfSense 2FA.
По-перше, переконайтеся, що ваше джерело аутентифікації налаштоване правильно, що включає використання зовнішнього постачальника ідентифікації (IdP), такого як OpenLDAP, Microsoft Active Directory, FreeIPA або окремий FreeRADIUS.
Важлива примітка:
Вбудований FreeRADIUS у pfSense має обмежений набір налаштувань і не дозволяє вказувати атрибут електронної пошти користувача. Через це обмеження ви не можете використовувати внутрішній FreeRADIUS для цієї інтеграції. Натомість, скористайтеся окремою інсталяцією FreeRADIUS або оберіть будь-який інший постачальник ідентифікації, згаданий у попередньому розділі.
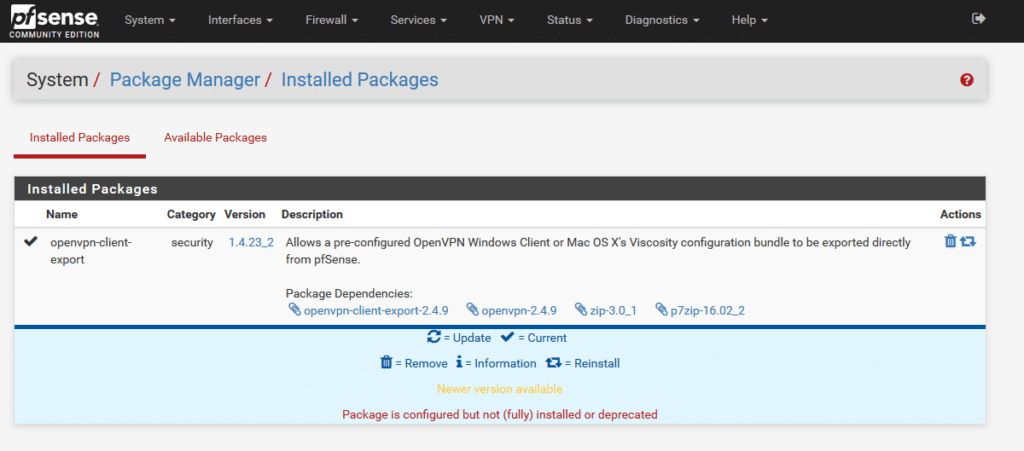
Важливо мати правильно налаштовану систему pfSense. Ми припускаємо, що ви вже додали сервер OpenVPN до pfSense через VPN → OpenVPN. Перед тим як розпочати впровадження багатофакторної аутентифікації через Protectimus, ви повинні мати налаштоване основне рішення аутентифікації для ваших користувачів OpenVPN. Якщо ви ще не встановили та налаштували pfSense, зверніться до документації на pfsense.org.

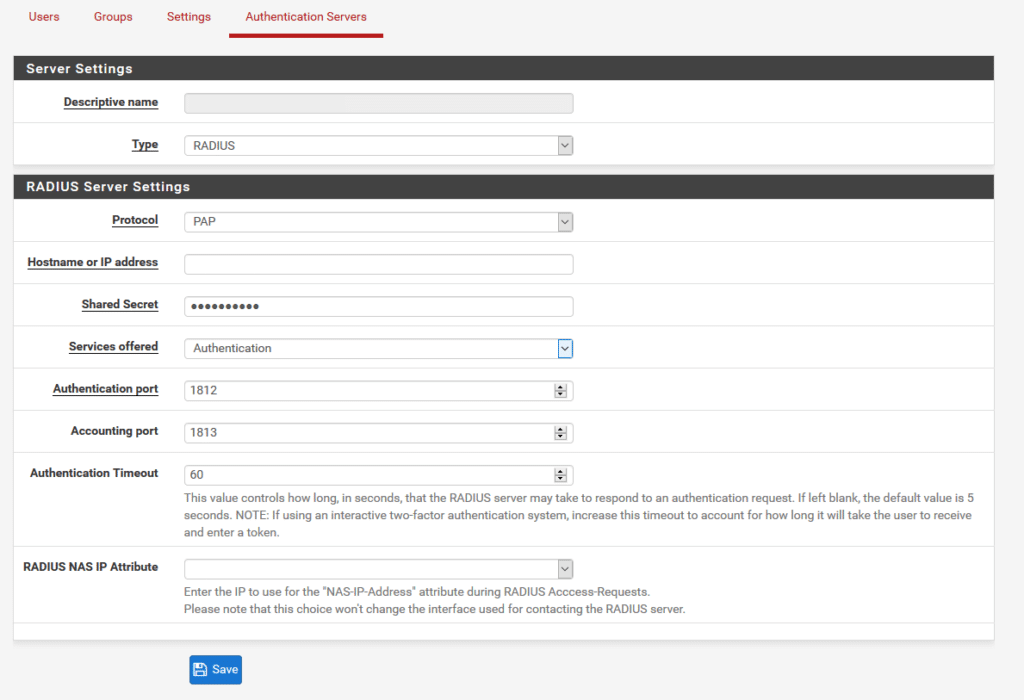
| Descriptive name | Додайте будь-яку назву, наприклад, Protectimus RADIUS Server. |
| Type | Завжди вибирайте RADIUS. |
| Protocol | Виберіть PAP. |
| Hostname or IP address | IP-адреса сервера, на якому встановлений компонент Protectimus RADIUS Server. |
| Shared Secret | Вкажіть секретний ключ, який ви створили в файлі radius.yml (властивість radius.secret) під час налаштування Protectimus RADIUS Server. |
| Services offered | Має бути Authentication. |
| Authentication port | Вкажіть 1812 (або порт, який ви налаштували у файлі radius.yml під час конфігурації Protectimus RADIUS Server). |
| Accounting port | Залиште значення за замовчуванням. |
| Authentication Timeout | Визначає допустимий час для відповіді RADIUS-сервера на запит автентифікації. За замовчуванням: 5. Рекомендується: 60. |
| RADIUS NAS IP Attribute | Введіть IP-адресу, яка буде використовуватися як атрибут “NAS-IP-Address” при відправленні RADIUS-запитів на доступ. |

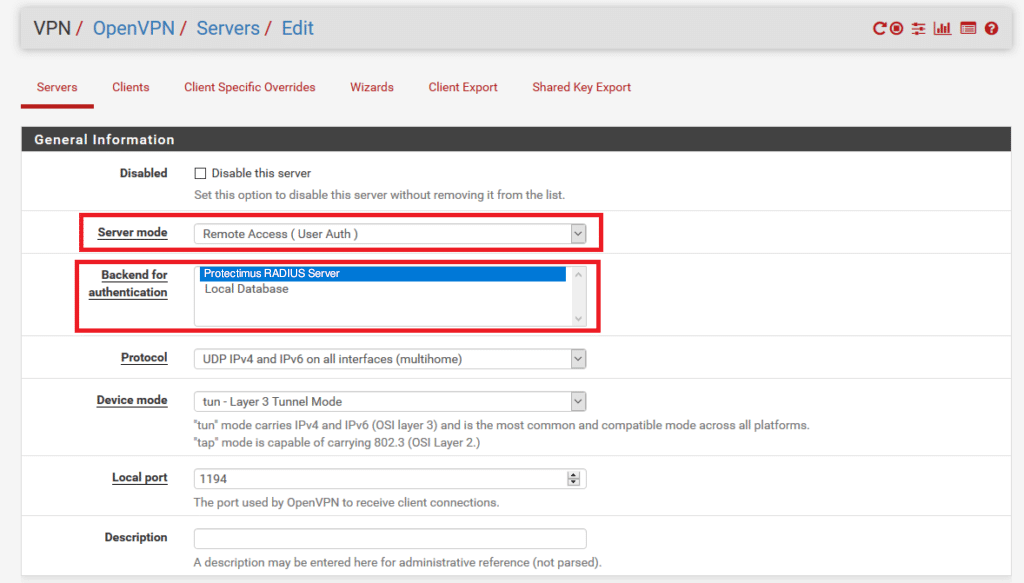
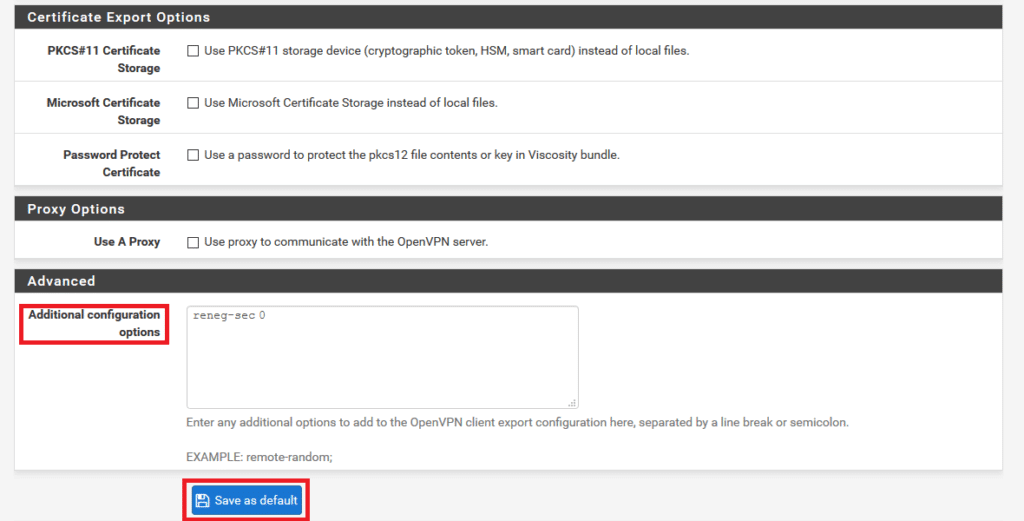
Ми радимо налаштувати reneg-sec на 0. Якщо буде обрано інше значення, є ймовірність, що ваші користувачі зіткнуться з запитами на повторну 2FA автентифікацію після того, як вичерпається час, визначений цим значенням.
За замовчуванням це значення становить 3600 секунд. Тому, якщо не використовувати опцію reneg-sec 0 і залишити додаткові параметри конфігурації порожніми, ваші користувачі будуть проходити повторну автентифікацію кожну годину.
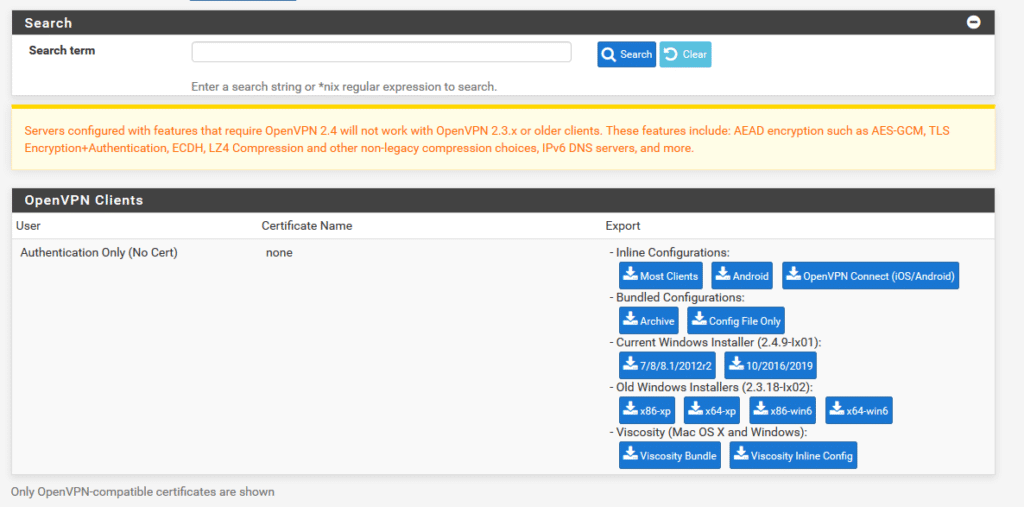
Інтеграція двофакторної автентифікації (2FA/MFA) для вашого pfSense OpenVPN завершена.
Якщо у вас є запитання, зверніться до служби підтримки клієнтів Protectimus.
Protectimus Ltd
Carrick house, 49 Fitzwilliam Square,
Dublin D02 N578, Ireland
Ірландія: +353 19 014 565
США: +1 786 796 66 64
Protectimus Ltd
Carrick house, 49 Fitzwilliam Square,
Dublin D02 N578, Ireland
Ірландія: +353 19 014 565
США: +1 786 796 66 64


